My Account     Contact Us     Cart

Creating a Super Overlay in Google Earth Pro

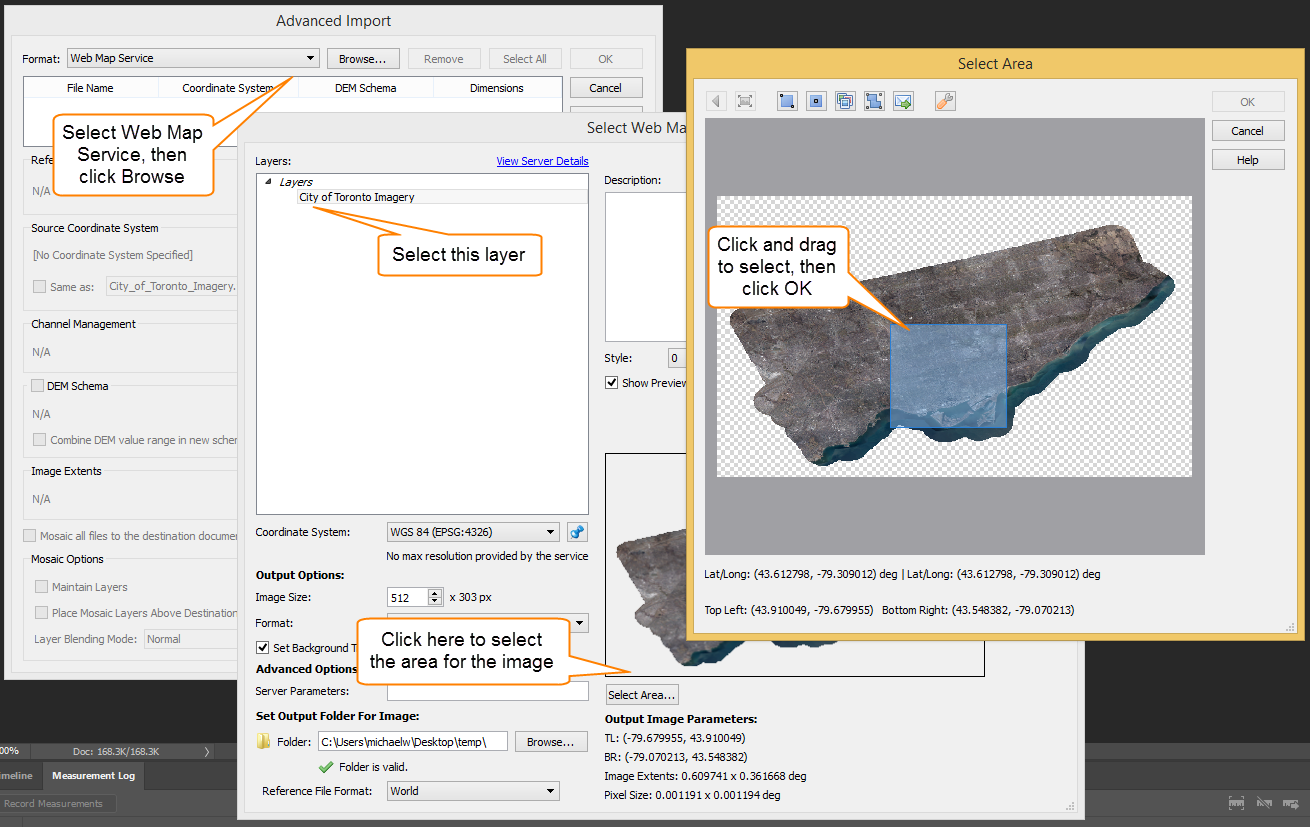
Our friends in the map library at Brock University in St. Catherines, Ontario have put together a very nice how-to on creating super overlays for Google Earth using Geographic Imager and Adobe Photoshop.

These instructions describe the process of georeferencing a high-resolution image, creating a geotiff file, using Google Earth Pro to make a super overlay and how to provide access to others. The full process is outlined here https://www.brocku.ca/maplibrary/Instruction/Creating_a_super_overlay.pdf

The Brock University Map Library can be contacted at maplib@brocku.ca

3D Terrain Model using Geographic Imager

PLEASE NOTE: As of Photoshop 22.5, Adobe has discontinued support for the program’s 3D features. This may affect some or all elements of this blog. For more information, see Adobe’s FAQ page about this change and the Geographic Imager compatibility information page.

We created a video to show that it is possible to use geospatial data and the 3D capabilities of Adobe Photoshop. It performs very well with a decent computer and video card.

In this video, a combination of Geographic Imager and Adobe Photoshop functions are used to open a DEM file using a script. The script also transforms a DEM into a 3D model and allows for an overlay of a colour model based on the data or a custom image (e.g. ortho image). Video after the jump.

https://youtube.com/watch?v=RgKmJRJUG4M

How to Create a 3D Rendition of a DEM With a Draped Image

PLEASE NOTE: As of Photoshop 22.5, Adobe has discontinued support for the program’s 3D features. This may affect some or all elements of this blog. For more information, see Adobe’s FAQ page about this change and the Geographic Imager compatibility information page.

NOTE: Prior to performing these steps with your data you would want to ensure that the DEM and image have the same geographic extents.

Item 2: Coordinate system of the map

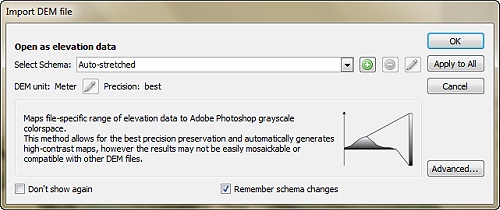
Using Geographic Imager, open your DEM file and set the desired schema type. In this case the DEM was “Auto stretched”.

Item 2: Coordinate system of the map

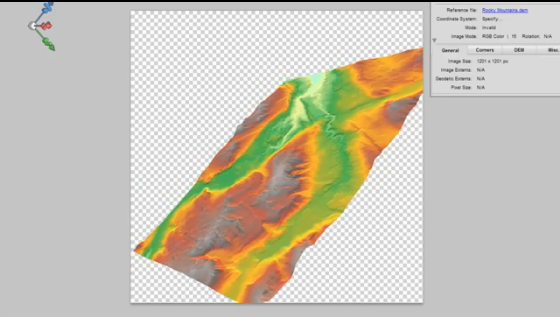
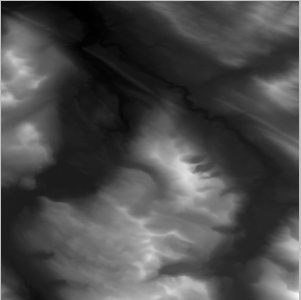
With the DEM now opened and rendered as a 16-bit grayscale Image we can now make use of a number of Adobe Photshop tools to render it in 3D and to drape the image.

Item 2: Coordinate system of the map

The following steps will outline the Adobe Photoshop procedures required to create the 3D rendition:

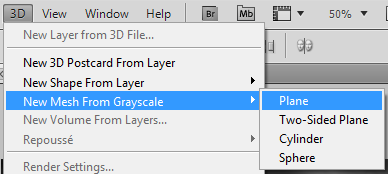
1. Create a 3D mesh: Under the 3D menu within Photoshop select “New Mesh From Grayscle->Plane”
Item 2: Coordinate system of the map

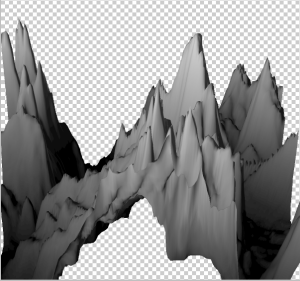
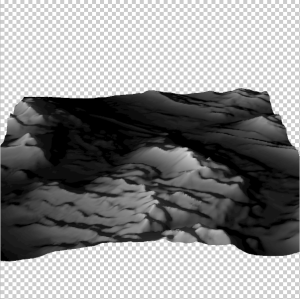
2. We then use the “3D Object Rotate Tool” located in the Photoshop toolbar to manually rotate the mesh tilting it backwards, resulting in something like this

Item 2: Coordinate system of the map

3. The resulting mesh is too exaggerated for a realistic rendering of the landscape so we will adjust the y orientation of it using the “3D Object Scale tool” setting the Y: scale to 0.10

Item 2: Coordinate system of the map

This is the image after vertically rescaling it

Item 2: Coordinate system of the map

4.Once the 3D mesh has been rescaled the image can be draped

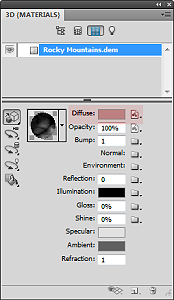
In the Adobe Photoshop “3D Materials” panel, click the “Edit Diffuse texture” button (as denoted in the screenshot below) and select the “Load Texture” option. Now locate and select the image you wish to drape on the 3D mesh.

Item 2: Coordinate system of the map

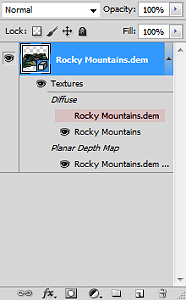
5. Within the Layers panel turn off the visibility of the Rocky Mountain DEM (as in the screenshot below).

Item 2: Coordinate system of the map

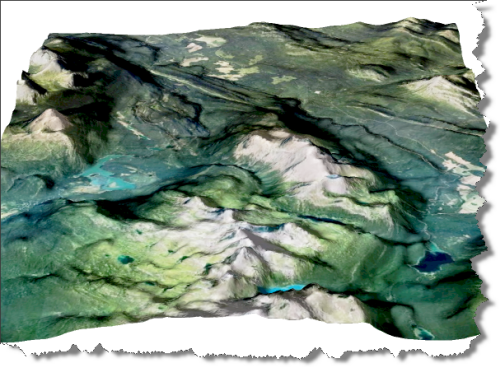
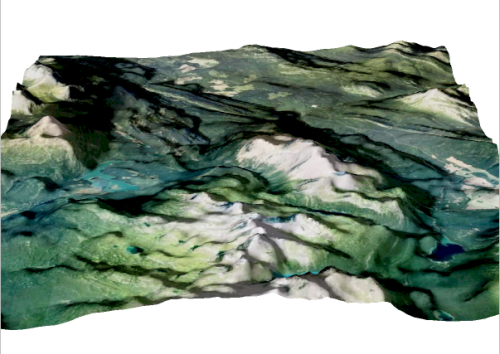
The end result should be a 3D model such as this.

Item 2: Coordinate system of the map

Georeferencing an Image in Adobe Photoshop with Geographic Imager

Today's topic: making an image georeferenced

As of Geographic Imager 5.0, there’s an updated workflow for georeferencing images. Learn more about Georeferencing and work through the tutorial.


Nowadays, it’s common to find great orthophotos and satellite imagery on the Web. However, after downloading these (sometimes) large files, you might find that some don’t have any georeferencing. Most likely these files are in an image format supported by Adobe Photoshop(e.g. JPG or TIF) and you can georeference it using the Geographic Imager Georeference tool.

These are the requirements to georeference an image:

  1. Knowing the coordinate system of the image (e.g. Mercator projection, State Plane system Alabama East, UTM system NAD 83 Zone 17 N..etc)
  2. Finding three or more points from the image to assign coordinate values to each of them. These points are known as ground control points.

The first thing you need to know is the coordinate system or projection of the image you are georereferncing. If you are unsure about which coordinate system the image uses, contact the data provider or search the metadata of the image on the Internet. If you cannot get the information of the coordinate system assigned to the image, you might want to try georeferencing with different coordinate systems to make the map as precise as possible.

The second requirement is working with the ground control points. One ground control point consists of several values: 1) Pixel X coordinate, 2) Pixel Y coordinate, 3) Ground X coordinate (e.g. longitude), and 4) Ground Y coordinate (e.g. latitude). Furthermore, to make georeferencing easier, ground control points must be clearly identifiable in the image. Cultural features such as road intersection, a sharp corner of a lot or boundary are good examples of locations used as ground control points.

Now that you know what you’ll need, we’ll demonstrate a georeference workflow using the Geographic Imager Georeference tool and Google Earth.

Step 1: Obtain a non-georeferenced image

This image is in JPEG format and there is no georeference information associated with it. In order to transform it to another coordinate system or projection, mosaic with other images, or align the image to vector work using MAPublisher for Adobe Illustrator, the image must first be georeferenced.

An example image collected

Step 2: Obtain the required information

As indicated above, two key pieces of information are required to georeference an image: a) the coordinate system of the image and b) defining ground control points

a) The coordinate system of the image

The image, collected from Google Earth, is projected in a coordinate system called WGS84 / Pseudo Mercator (this projection is common to Web based mapping systems and is also known as Web Mercator or Google projection).

b) Defining ground control points

We’ll need to define at least three ground control points for georeferencing. Below are the steps for finding out one of the ground control points.

On the non-georeferenced image, decide which spot to use as a point of reference. It should be available on Google Earth where you’ll find the X,Y coordinate values. For the first point, we’ll use the corner boundary between the pavement and a golf course.

a ground control point selected on my image

Using Google Earth, find the exact same spot as the one decided in the non-georeferenced image. Place a point symbol to help identify the coordinate values. Record the collected latitude and longitude values. The latitude and longitude values are at the centre of the point symbol symbol in the Google Earth window.

collecting the latitude and longitude values from Google Earth

Find the coordinates of two additional ground control points. The latitude and longitude values are in decimal degree format and the coordinate system of those values are in the geodetic system “WGS84”.

collected three ground control points

Step 3: Georeference in Geographic Imager

In Geographic Imager, click the Georeference tool button Geographic Imager: Georeference in the Geograhpic Imager main panel (or choose File > Automate > Geographic Imager : Georerence). The Georeference dialog box will open.

Geographic Imager: Georeference window

First, we’ll need to set the proper image coordinate system and input coordinate system (the information from Step 2a). In the Format section, click the blue “Specify” link to open the Input Format dialog box.

Georeference: Input

Here we’ll specify two parameters: Image Coordinate System and alternate input coordinate system. The image of the coordinate system is WGS84 / Pseudo-Mercator as found at Step 2a. Click the “Specify” button to find the coordinate system from the coordinate systems list.

The option “Use alternate input coordinate system” will not have to be selected if the X,Y coordinate values are collected in the Eastings/Northings in the WGS84 / Pseudo-Mercator coordinate system. When those latitude and longitude values are collected, those values are collected in the decimal degree format and the values are in degree in WGS84. We will use those latitude and longitude values for the georeferencing. Specify the destination coordinate system as WGS84.

When the settings are made, click OK to close the Input Format dialog box. All the selected coordinate system for each setting will be indicated in the Format section of the Georeference dialog box.

Georeference : Input image coordinate system and input coordinate system

The next step is to enter the three ground control points collected from Google Earth. Click the pencil tool at the top of the Georeference dialog box and click a point for one of the ground control points collected at the previous steps Georeference : Pencil tool.

a ground control point selected on my image

As soon as one point is clicked on the preview image, it will add one row in the Georeference table. This row contains the point name, PX (Pixel x coordinate), PY (Pixel y coordinate), WX (World X coordinate), and WY (World Y coordinate).

Ground control point 1

For WX and WY, enter the longitude and latitude, respectively, for the first ground control point.

ground control 1: completed

Repeat the same steps for the second and third ground control points.

All three ground control points are entered

As soon as you enter three points, Geographic Imager will display the residual error values on the table for the accuracy assessment.

GCP Error

A residual error is the computed difference between an observed source coordinate and a calculated source coordinate. It is the measure of the fit between the true locations and the transformed locations of the output control points. A high residual error indicates possible error in either the observed source coordinates or the reference coordinates of the reference point in question.

When the error is particularly large, you may want to remove and add control points to adjust the error. As a general rule, apply several different transformation methods, select/deselect questionable points and select the method and reference points that yield the minimum residual error, assuming that the defined reference points are correct. Residual values are calculated via the associated error values between computed values and entered values through either the affine or various polynomial methods.

Once completed, the Geographic Imager main panel will indicate the georeference information of the image. Don’t forget to save the file once it is complete. Now your image is ready for any Geographic Imager function. You can also bring this image into MAPublisher for Adobe illustrator and align it to other GIS data.

Georeference information displayed on the Geographic Imager Main panel

New Transformation Method for World Maps in Geographic Imager 3.2

When transforming a world image, there may be artifacts created by the Geographic Imager transformation engine. Below are the results of a WGS84 world image transformed into a Stereographic projection.

Geographic Imager 3.1 transformation result

When we zoom into the problematic area, you can see up close how some artifacts affect the image after the transformation was performed.

Geographic Imager 3.0 transformation result 2

To solve this issue, we are introducing a new projection method called Maximum: World Projection in Geographic Imager 3.2.

We are going to use the same world image used with the previous example and transform it into the stereographic projection. Take a close look at the Advanced Options.

Geographic Imager 3.2: Transformation Dialog box

Under the Performance/quality section, select Maximum / World Projections from the Precision drop-down list and click OK.

Geographic Imager 3.2: Maximum / World Projections option

Below is the result of the transformation with the new method available in Geographic Imager 3.2.

Geographic Imager 3.2 transformation result

Let’s take a close look at the same area where the problem happened with the previous version of Geographic Imager. Now the transformed image does not contain any artifacts.

Geographic Imager 3.2: result (zoom in!)

This option is available since Geographic Imager 3.2. The official version of Geographic Imager 3.2 is available now.

Creating a Custom Coordinate System from a Predefined Coordinate System

When transforming a world map in a geodetic system (such as WGS84) to a predefined projection (such as Robinson) using MAPublisher, the central meridian of the predefined projection should be set to 0 degree longitude as shown below.

Image 1: world map in WGS84

World map in WGS84 geodetic system

Image 2: world map in a predefined Robinson Projection

World map with the Robinson Projection with default settings

However, you might want to have a map with a different region centred on your map. For example, Image 3 below shows a world map with a part of Asia centred. In this case, the central meridian was set to 160 degrees East.

Image 3: world map in a custom Robinson Projection with a central meridian value set to 160 degree East

World map in a custom Robinson projection

Today we’ll introduce how to create a custom coordinate system by modifying a predefined coordinate system. We’ll use an example using a GIS dataset world.mif available in the MAPublisher Tutorial folder. We are going to transform a world map to a custom central meridian value with the Robinson projection.

Step 0 : import the “world.mif” file from MAPublisher tutorial folder.

step0:: import World.mif

Step 1 : Open the MAP View Editor window from the MAP Views panel.

In the MAP View Editor window, you can see that the scale of the map, position of the map extent with respect to the current document extent, and most importantly the current coordinate system assigned to the MAP View.

step 1: MAP View Editor window

We are going to transform the MAP View from WGS84 to the Robinson projection with a custom central meridian value. Check the “Perform cordinate System Transformation option.

Click the Specify button under the “Perform Coordinate System Transformation” section. It will open the “Specify Destination Coordinate System” dialog box.


Step 2: Creating a custom coordinate system with the Robinson projection

We are going to create a custom coordinate system based on the Robinson projection by modifying the existing Robinson projection. Find the existing Robinson projection from the list.

On the left side, navigate to Coordinate system > Projected > World. Highlight the folder “World”. You will see the list of the predefined coordinate systems available on the right side of the window. Find the “Robinson” and highlight it.

Step 2: Finding the predefined Robinson Projection

Once the predefined Robinson projection is highlighted, click the Copy button copy button at the bottom. It will duplicate the existing coordinate system and will open the “Projected Coordinate System Editor” dialog box for the duplicated coordinate system.

In the Projected Coordinate System Editor dialog box, there are two tabs: Identification and Definition. In the Identification tab, enter a new name for this customer coordinate system. This name will be used when you are searching the object.

Step 4: Projected Coordinate System Editor

Click the Definition tab. Change the value of central_meridian from 0 (default) to 160. Click OK to apply this new setting. You have just made a custom coordinate system based on the existing Robinson projection.

step 5: Projected Coordinate System Editor (Definition)

Step 3: Complete the Transformation

Under the “Perform Coordinate System Transformation”, the new custom coordinate system just created is indicated. Now you are ready to transform your map.

step 6: MAPView Editor with a transformation option

Now the world map is successfully transformed into the custom coordinate system (Robinson with the central meridian set to 160 degree East).

Transformed Robinson

You might want to take a look at this other blog about the new transformation engine implemented in MAPublisher 8.3.

Transforming an image into a custom coordinate system with Geographic Imager

You can use the same approach to transform your image into a custom coordinate system.

First, we open a world image that has a WGS84 coordinate system.

a world image in WGS84

Click the Transform button in the Geographic Imager main panel. It will open the Transform dialog box.

Click the Specify button. Now repeat Step 2 illustrated above to create a custom coordinate system. Once you select the custom coordinate system in the “Specify Coordinate System” dialog box, it will be indicated in the Transformation dialog box (in the example below, a custom coordinate system “Robinson cm @ 160 degree East” is selected as a destination coordinate system).

Geographic Imager: Transform dialog box

As soon as you click the Transform button, the transformation process will start. Once the transformation process is completed, the Geographic Imager main panel will indicate the new custom coordinate system name.

Transform completed.

Geographic Imager 3.2: Introduction to Terrain Shader, Part 3 – Applying Terrain Shader to multiple DEM files

If your workflow involves Terrain Shader, specifying a DEM schema is an important step, especially when dealing with mulitple DEM files.

When importing a single DEM file, Geographic Imager converts elevation values to gray scale values. For example, if the elevation range in your DEM file is between 0 and 2500 meters and the “Auto-stretched” option is selected, this range will be converted to the Adobe Photoshop gray scale range between black and white. As shown below, the black color is assigned to the lowest elevation value (0 meter) while the white color is assigned to the highest elevation value (2500 meters). For elevation values between 0 and 2500, Geographic Imager calculates and converts them into gray scale.

Import DEM File - Auto-stretched

In this example, we’ll use six DEM files of one geographic region. Many datasets are distributed as tiled DEM files. Each of them is next to each other and the goal is to create a colorized DEM image from those six files.

Collected 6 dem files

When dealing with multiple DEM files, you will need to consider the elevation range of the each DEM file. In other words, the elevation range in each DEM file will be slightly different.

table: elevation range in each DEM file Chart: Elevation range in each DEM files

Option 1: Using the “Auto-Stretched” option for multiple DEM files

When importing multiple DEM images and using the “Auto-stretched” option, click “Apply to All”…

Dialog window: Import DEM file - auto stretched

Every one of the DEM images will be converted to the gray scale between black and white.

graph: stretching the gray scale to every image file

As a result, you can get the maximum contrast in each image. However, you will not be able to mosaic or apply Terrain Shader to those six images because each DEM has slight differences in elevation and an all encompassing schema like the”Auto-stretched” option will not work.

DEM images opened with Auto-stretched

Option 2: Creating a DEM schema by specifying a range

In order to apply Terrain Shader to multiple DEM files, you will need to assign one DEM schema to each DEM image you would like to share the same schema.

Step 1: Identify the elevation range amongst multiple DEM files

Explore the DEM files and find out what the elevation range is for each one. Then note which are the lowest and highest values among all DEMs. For this example, the lowest elevation is 0 m and the highest is 3,231 meters.

Finding the range among multiple DEM files

Step 2: Create a new DEM schema for your dataset

Choose File > Open and select multiple DEM files. Once the Import DEM file dialog box is open, click the Add button to open the “Edit DEM Schema” dialog box.

Create a new Schema name (e.g. “my study area”). Simply enter the lowest and highest elevation value found in Step 1.

Dialog window: Edit DEM Schema - specifying the range for the DEM schema

Step 3: Apply the DEM schema to your datasets

When you’ve created a new DEM schema, it will be available in the “Select Schema” drop-down list. Choose the new schema and click “Apply to All”. This selected schema will be applied to all the DEM files being imported.

dialog window: Importing DEM file with the same schema

After the import process is completed, the images are ready for Terrain Shader.

All the DEM files imported with the same DEM schema

When one of the imported DEM file is the active document, click the “DEM” tab in the Geographic Imager panel. It shows the DEM schema name, the DEM value range, and the actual elevation value available in the currently active document. Click the “Calculate” button if you do not see the statistics (actual elevation value range of the active document).

Geographic Imager Main Panel

Step 4: Apply Terrain Shader to your DEM files

Since each DEM has a schema, a mosaic can be perfomed and then Terrain Shader can be applied to the mosaicked iamge.

DEM files mosaicked and Terrain Shader effect is applied

Geographic Imager 3.2: Introduction to Terrain Shader, Part 1

The upcoming release of Geographic Imager 3.2 introduces a new feature called Terrain Shader, used to apply color gradients and shaded relief to imported DEM images. Color gradients can be exported so that you can use them for other images or share them with other people.

You might want to take a look at our brief video about the Geographic Imager Terrain Shader on our Avenza YouTube channel.

In this blog, I’ll show you a quick workflow with Terrain Shader using one of the files from the Geographic Imager tutorial folder.

1) Open the DEM file called Yukon Water.dem from the Geographic Imager Tutorial Folder in Adobe Photoshop. Geographic Imager will automatically detect the file type so that you will see the “Import DEM File” dialog box(below).

When your workflow involves Terrain Shader, it is important to select an appropriate schema in the Import DEM file dialog box. For now, we’ll use the option “Auto-stretched”. We’ll return to this dialog box when we talk about an advanced use of Terrain Shader feature in another blog.

Importing a DEM file

After the DEM file is successfully imported, you will see the geospatial information, the DEM schema and the value range information in the Geographic Imager panel. The panel has been redesigned and improved for version 3.2 (We think it works really well!)

Geographic Imager Main Panel: displaying the information of the dem file just imported

2) Click the Terrain Shader button.

Terrain Shader icon on Geographic Imager Main Panel

In the Terrain Shader dialog box, on the left side, you can see the elevation range of the DEM file. There is a large preview image at the centre of the dialog box.

Terrain Shader Main Dialog Window

3) Click the check box beside “Apply Color Map” to apply a color gradient to the DEM image.

You can select one gradient from the preset gradients from the dropdown menu. Or you can edit the color gradient form the existing one. Click the pencil icon next to the preset dropdown menu. In the Edit Color Map dialog box, you can modify the gradient scheme. You can change colors, add ramps, adjust the ramp position, ….etc.

Editing Color Scheme

4) Click OK to apply the modication.

5) Another great function with the Terrain Shader is to apply the shaded relief effect at the same time. Click the check box beside “Applly Shaded Relief”.

You can adjust the angle of the source light and the intensity of the contrast. You can see how the settings affect the DEM image in the preview.

Applying a shaded relief effect

6) The DEM is stylized with a color gradient and a shaded relief effect.

colorized dem image with a shaded relief effect

Stay tuned for Introduction to Terrain Shader, Part 2

Geographic Imager 3.2: Introduction to Terrain Shader, Part 2 – Creating shaded relief

In a previous blog, we showed you how to create a shaded relief image from an imported DEM file by using either our JavaScript to automate all the processes or through a manual method.

With Geographic Imager 3.2, you can produce a shaded relief image using the new feature Terrain Shader quickly and easily with just a few clicks.

We will use the Rocky Mountain.dem file available in the Geographic Imager tutorial folder.

1) Open the Rocky Mountain.dem file in Adobe Photoshop. As mentioned in the previous blog, selecting an appropriate DEM schema is an important step before using the Terrain Shader. For this image, we will choose the “Auto-stretched” option, which will give you an optimum result in Terrain Shader.

Import DEM File dialog window

2) Click the Terrain Shader button on Geographic Imager main panel.

Terrain Shader Icon

3) In the Terrain Shader dialog box, uncheck the “Apply Color Map” option and check the “Apply Shaded Relief” option.

Terrain Shader Main Window

4) In the Apply Shaded Relief settings, adjust the light source angle and intensity.

As you adjust the settings, use the preview image to get a sense of what your image will look like.

Terrain Shader: Apply Shaded Relief

Now that a shaded relief image is created, lets tweak it a little and make some adjustments.

Shaded Relief Image right after Step 4

The shaded relief image looks dark. It is because the blending mode of the shaded relief layer, #GI Shaded Relief Layer, is set to “Overlay” (the drop-down menu in the Layers panel).

5) Highlight #GI Shaded Relief Layer and Change the blending mode to “Normal”.

Layers panel: changing the Blending mode to Normal

Alternatively, simply turned off the visibility of the original DEM layer “Rocky Mountain.dem” in the Layers panel.

Layers panel after Terrain Shader is applied

You will get the same effect. The shaded relief now shows the crisp shading effect.

Shaded Relief Image after the original DEM file is made invisible

6) If you want to change the brightness and contrast of the produced shaded relief image, you can simply add an adjustment layer in the Layers panel.

Layers Panel: Adding an adjustment layer

Simply adjust the brightness and contrast values in the Adjustments panel.

Adjustment Panel: adjusting contrast

Now, the shaded relief image is ready for your map!

Adjusted shaded relief image

As always, when you use Geographic Imager, all the georeference information is maintained while you work with Adobe Photoshop and Geographic Imager functions. This is a great advantage when dealing with geospatial datasets.

Georeference information displayed on the Geographic Imager Main Panel

One quick note: If you want to use a shaded relief image with MAPublisher in Adobe Illustrator, you may save the shaded relief image with spatial reference information. Before saving the image, go to Image > Mode > 8 Bits/Channels. It will convert the image from 16 bits to 8 bits, which is necessary when working with images in Adobe Illustrator.

Changing the image mode from 16 bit to 8 bit

To place the image in Adobe Illustrator, use the MAPublisher “Register Image” function to align the image with your vector work.

Using these steps will add a nice texture to your map.

Geographic Imager: Create shaded relief from a DEM

With Geographic Imager 3.x, you can import DEM files to Adobe Photoshop and can create shaded relief images.

step 12: Shaded relief image completed

There are two methods to achieve this:

Method 1: Run the pre-made JavaScript and apply it to all images

After opening your DEM image, choose File > Scripts > Browse… and select Shaded Relief.jsx from the SampleScripts folder inside the Geographic Imager Tutorial folder. It will generate the shaded relief image for the opened DEM image based on the settings in the JavaScript file.


Method 2: Create shaded relief images manually

We’ll use the DEM file Rocky Mountains.dem available in the Geographic Imager Tutorial folder for this demonstration.

1) Open the Rocky Mountains.dem image from the Geographic Imager tutorial folder. Geographic Imager automatically detects it as a DEM file and provides the option to select the DEM image import method. For this demonstration, choose Auto-Stretched from the Select Schema drop-down list.

Step 1: Import DEM file option

The imported DEM is opened in black and white. Take a look at the header of the image (or tab of the image file). Notice that it displays “Gray/16”. This indicates that the image is in the 16 Bits/Channel Grayscale mode.

step 1: Imported DEM image

2) Now, change the image mode from 16 Bits/Channel Grayscale to 8 Bits/Channel RGB. From the top menu bar, choose Image > Mode and then 8 Bits/Channel. Once again, go to Image > Mode, this time choose RGB Color.

step 2: Changing the color mode

Once completed, take a look at the image header again (or file tab). Now “RGB/8” is indicated in the header, meaning that the image is now in the 8 Bits/Channel RGB color mode.

step 2: Color mode changed

3) Select the entire canvas (use the Rectangular Marquee Tool) and copy the selected area to the clipboard (Edit > Copy).

step 3: Select the entire canvas

4) Open the Channels panel (Window > Channels) and add one Alpha channel by clicking the Create new channel button at the bottom of the panel or go to the panel option menu and choose New Channel. Leave the channel name as “Alpha 1”.

step 4: create a new channel

5) Select the “Alpha 1” in the Channels panel and fill it in white using the Paint Bucket Tool.

step 5: Filling Alpha channel

6) In step 3 we copied the selected area (the entire canvas) to the clipboard, now we’re going to paste it to the new channel. Select “Alpha 1” in the Channels panel, and paste it (Edit > Paste). You can see that the same image is displayed for all the channels when the copied area is successfully pasted. Make the Alpha 1 channel invisible and make sure the RGB channels are visible.

step 6: pasted canvas

7) Deselect the area (Select > Deselect from the top menu bar).

step 7: deselected area

8) In the Layers panel (Window > Layers), create a new layer named Bump map. Change the Blending mode to Overlay. step 8: New Layer "Bump map"

9) Using the Paint Bucket Tool again, fill the new “Bump map” layer with white.

step 9: fill white

10) From the menu bar, choose Filter > Render > Lighting Effects…

step 10: Menu Filter > REnder > Lighting Effects ...

11) Adjust the settings in the Lighting Effects dialog window.

step 11: adjusting the light effect

12) The shaded relief image is completed! You can use this image to overlay with other georeferenced images with Geographic Imager or with vector datasets with MAPublisher.

step 12: Shaded relief image completed

News Archive