My Account     Contact Us     Cart

Avenza Releases Geographic Imager 3.2 for Adobe Photoshop

– New version includes Terrain Shader tool and geospatial PDF support –

Toronto, ON, October 25, 2010 – Avenza Systems Inc., producers of MAPublisher® cartographic software for Adobe Illustrator® and PDF Maps for Apple iOS, is pleased to announce the release of Geographic Imager 3.2 for Adobe Photoshop. Along with support for Adobe CS5 and Mac OS 64-bit, it includes the ability to create and export geospatial PDF documents and terrain shading functionality.

“Our users love the geospatial PDF authoring abilities of MAPublisher, and we’re delighted to introduce that functionality to Adobe Photoshop,” said Ted Florence, President of Avenza. “Users can now easily convert a wide variety of spatial image formats, including GeoTIFF and MrSID, to spatially-aware PDF files without the need of specialized GIS software. These documents can be shared with anybody using Adobe Reader 9 or better, and can now be easily viewed on Apple iOS devices with the PDF Maps app.” he added.

This release also features the new Geographic Imager Terrain Shader that allows users to dynamically apply terrain shading and colours to digital elevation models within Adobe Photoshop.

“The Geographic Imager Terrain Shader is an exciting feature that demystifies hill shading as a difficult process,” said Doug Smith, Avenza Director of Sales. “Users can now easily and quickly import a DEM, apply colours and shades based on elevation and apply a specific light source position and intensity to achieve a desired shading effect. This is a very powerful tool and clearly shows how valuable Adobe Photoshop is as a bona fide spatial image processing platform.” he added.

Geographic Imager geospatial PDF support

Geographic Imager 3.2 provides both export and import support for Adobe geospatial PDF as well as import support for the proprietary GeoPDF format. The following functions can be performed on geospatial PDF files in Adobe Acrobat without the aid of any special tools, plug-ins or other special extensions:

  • View map locations in various coordinate systems including decimal degrees, DMS, Military Grid and more
  • Find a location in a map and mark it with a comment
  • Measure distances on a map using real-world units (miles, kilometers, feet, etc.)

Geospatial PDF files created in Geographic Imager 3.2 can be viewed with the PDF Maps app on Apple iOS devices.

Geographic Imager Terrain Shader features

  • Easily generate custom colour maps, export or use predefined ones
  • Use gradients to colorize DEM images specifying elevation intervals
  • Use intuitive controls to adjust light source position and intensity to create shaded relief


Additional Geographic Imager 3.2 features

  • Support for Adobe Creative Suite 5 and Mac OS 64 bit
  • Redesigned Geographic Imager panel
  • Improved Advanced Import tool and new Transform tool options


More about Geographic Imager for Adobe Photoshop

Geographic Imager is powerful software for working with spatial imagery in Adobe Photoshop that leverages its superior image editing capabilities and transforms it into a powerful spatial imagery editing tool. Work with satellite imagery, aerial photography, orthophotos, and DEMs in GeoTIFF and other major GIS image formats using Adobe Photoshop features such as transparencies, filters, and image adjustments while maintaining georeferencing and support for hundreds of coordinate systems and projections.

Geographic Imager 3.2 is available immediately free of charge to all Geographic Imager Maintenance Program members, as an upgrade for US$319 for non-maintenance members and at prices starting at US$699 for new users.

More about Avenza Systems Inc.

Avenza Systems Inc. is an award-winning, privately held corporation that provides cartographers and GIS professionals with powerful software tools for making better maps. In addition to software offerings for Mac and Windows users and Apple i-devices, Avenza offers value-added data sets, product training and consulting services. Visit www.avenza.com for more details.

Creating a Custom Coordinate System from a Predefined Coordinate System

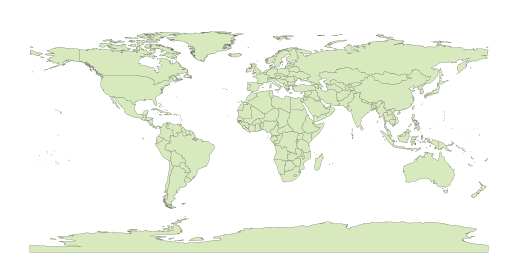
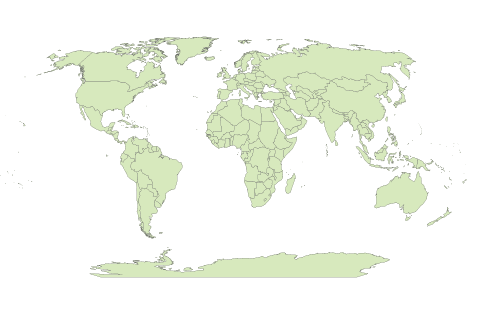
When transforming a world map in a geodetic system (such as WGS84) to a predefined projection (such as Robinson) using MAPublisher, the central meridian of the predefined projection should be set to 0 degree longitude as shown below.

Image 1: world map in WGS84

World map in WGS84 geodetic system

Image 2: world map in a predefined Robinson Projection

World map with the Robinson Projection with default settings

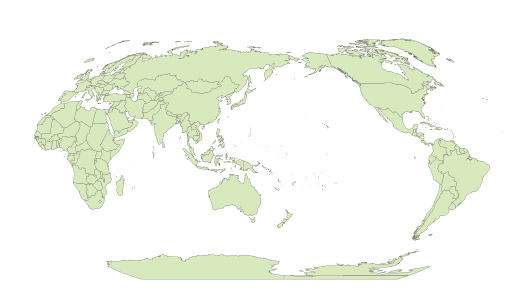
However, you might want to have a map with a different region centred on your map. For example, Image 3 below shows a world map with a part of Asia centred. In this case, the central meridian was set to 160 degrees East.

Image 3: world map in a custom Robinson Projection with a central meridian value set to 160 degree East

World map in a custom Robinson projection

Today we’ll introduce how to create a custom coordinate system by modifying a predefined coordinate system. We’ll use an example using a GIS dataset world.mif available in the MAPublisher Tutorial folder. We are going to transform a world map to a custom central meridian value with the Robinson projection.

Step 0 : import the “world.mif” file from MAPublisher tutorial folder.

step0:: import World.mif

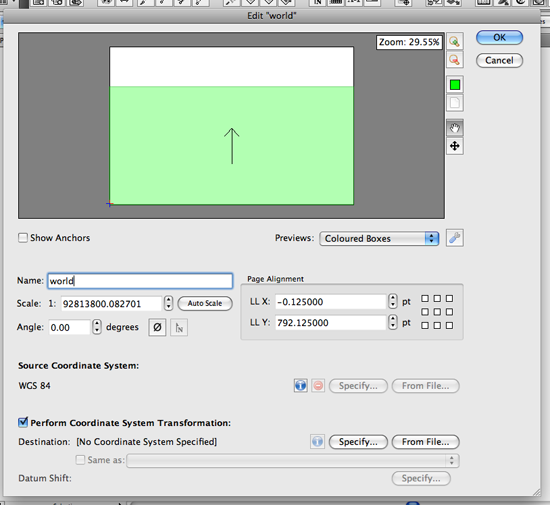
Step 1 : Open the MAP View Editor window from the MAP Views panel.

In the MAP View Editor window, you can see that the scale of the map, position of the map extent with respect to the current document extent, and most importantly the current coordinate system assigned to the MAP View.

step 1: MAP View Editor window

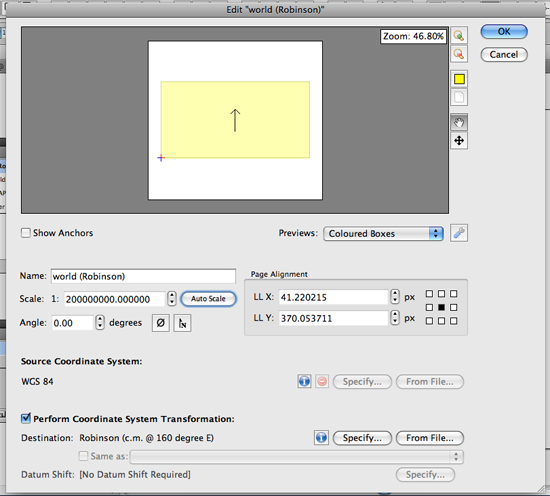
We are going to transform the MAP View from WGS84 to the Robinson projection with a custom central meridian value. Check the “Perform cordinate System Transformation option.

Click the Specify button under the “Perform Coordinate System Transformation” section. It will open the “Specify Destination Coordinate System” dialog box.


Step 2: Creating a custom coordinate system with the Robinson projection

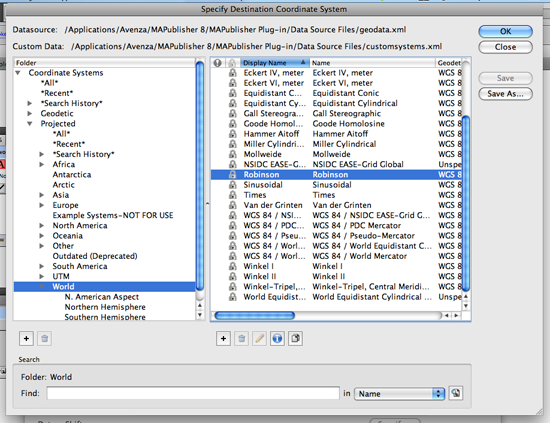
We are going to create a custom coordinate system based on the Robinson projection by modifying the existing Robinson projection. Find the existing Robinson projection from the list.

On the left side, navigate to Coordinate system > Projected > World. Highlight the folder “World”. You will see the list of the predefined coordinate systems available on the right side of the window. Find the “Robinson” and highlight it.

Step 2: Finding the predefined Robinson Projection

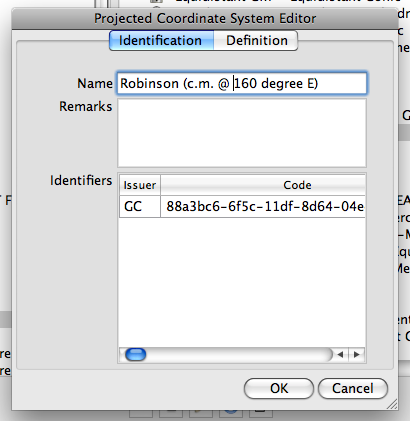
Once the predefined Robinson projection is highlighted, click the Copy button copy button at the bottom. It will duplicate the existing coordinate system and will open the “Projected Coordinate System Editor” dialog box for the duplicated coordinate system.

In the Projected Coordinate System Editor dialog box, there are two tabs: Identification and Definition. In the Identification tab, enter a new name for this customer coordinate system. This name will be used when you are searching the object.

Step 4: Projected Coordinate System Editor

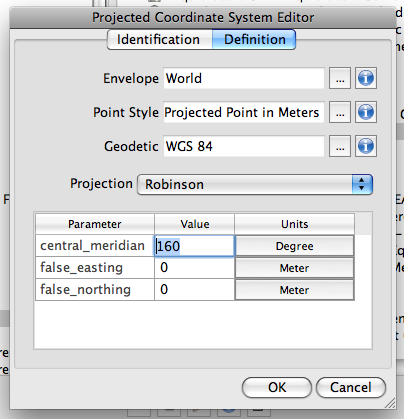
Click the Definition tab. Change the value of central_meridian from 0 (default) to 160. Click OK to apply this new setting. You have just made a custom coordinate system based on the existing Robinson projection.

step 5: Projected Coordinate System Editor (Definition)

Step 3: Complete the Transformation

Under the “Perform Coordinate System Transformation”, the new custom coordinate system just created is indicated. Now you are ready to transform your map.

step 6: MAPView Editor with a transformation option

Now the world map is successfully transformed into the custom coordinate system (Robinson with the central meridian set to 160 degree East).

Transformed Robinson

You might want to take a look at this other blog about the new transformation engine implemented in MAPublisher 8.3.

Transforming an image into a custom coordinate system with Geographic Imager

You can use the same approach to transform your image into a custom coordinate system.

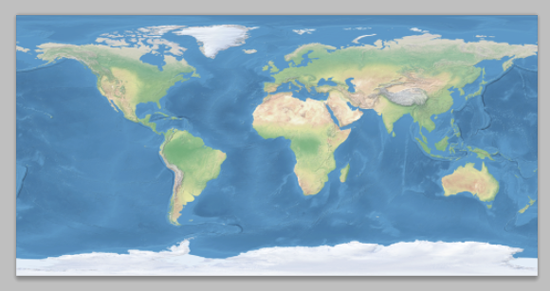
First, we open a world image that has a WGS84 coordinate system.

a world image in WGS84

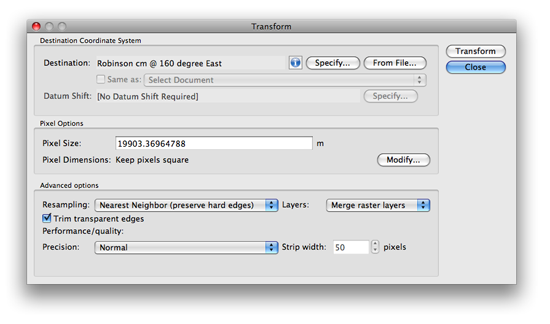
Click the Transform button in the Geographic Imager main panel. It will open the Transform dialog box.

Click the Specify button. Now repeat Step 2 illustrated above to create a custom coordinate system. Once you select the custom coordinate system in the “Specify Coordinate System” dialog box, it will be indicated in the Transformation dialog box (in the example below, a custom coordinate system “Robinson cm @ 160 degree East” is selected as a destination coordinate system).

Geographic Imager: Transform dialog box

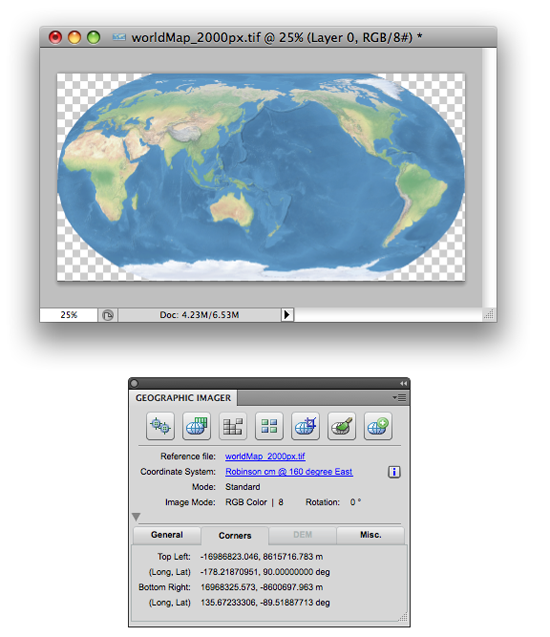
As soon as you click the Transform button, the transformation process will start. Once the transformation process is completed, the Geographic Imager main panel will indicate the new custom coordinate system name.

Transform completed.

News Archive