My Account     Contact Us     Cart

Geographic Imager 3.2: Introduction to Terrain Shader, Part 2 – Creating shaded relief

In a previous blog, we showed you how to create a shaded relief image from an imported DEM file by using either our JavaScript to automate all the processes or through a manual method.

With Geographic Imager 3.2, you can produce a shaded relief image using the new feature Terrain Shader quickly and easily with just a few clicks.

We will use the Rocky Mountain.dem file available in the Geographic Imager tutorial folder.

1) Open the Rocky Mountain.dem file in Adobe Photoshop. As mentioned in the previous blog, selecting an appropriate DEM schema is an important step before using the Terrain Shader. For this image, we will choose the “Auto-stretched” option, which will give you an optimum result in Terrain Shader.
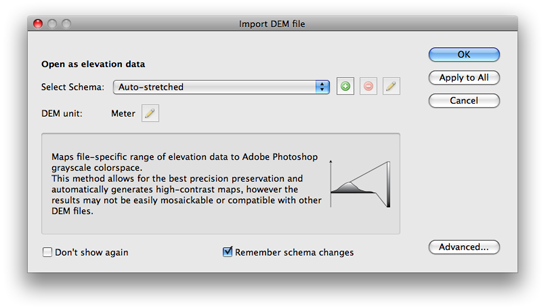
Import DEM File dialog window

2) Click the Terrain Shader button on Geographic Imager main panel.

Terrain Shader Icon

3) In the Terrain Shader dialog box, uncheck the “Apply Color Map” option and check the “Apply Shaded Relief” option.
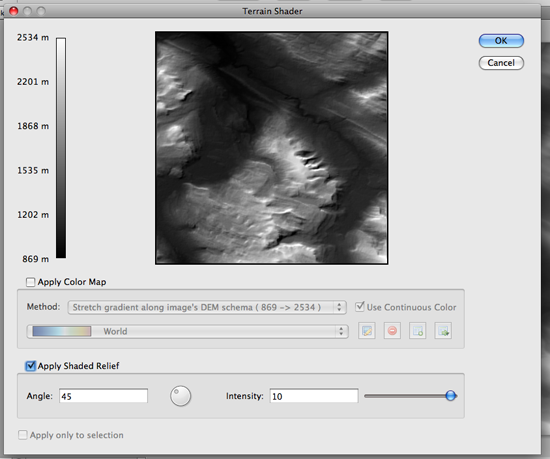
Terrain Shader Main Window

4) In the Apply Shaded Relief settings, adjust the light source angle and intensity.

As you adjust the settings, use the preview image to get a sense of what your image will look like.

Terrain Shader: Apply Shaded Relief

Now that a shaded relief image is created, lets tweak it a little and make some adjustments.
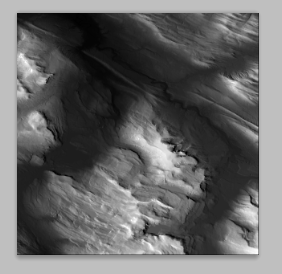
Shaded Relief Image right after Step 4

The shaded relief image looks dark. It is because the blending mode of the shaded relief layer, #GI Shaded Relief Layer, is set to “Overlay” (the drop-down menu in the Layers panel).

5) Highlight #GI Shaded Relief Layer and Change the blending mode to “Normal”.
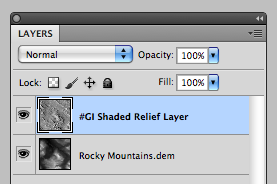
Layers panel: changing the Blending mode to Normal

Alternatively, simply turned off the visibility of the original DEM layer “Rocky Mountain.dem” in the Layers panel.
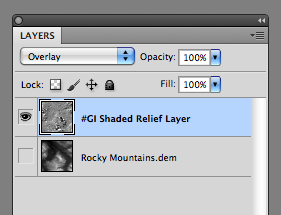
Layers panel after Terrain Shader is applied

You will get the same effect. The shaded relief now shows the crisp shading effect.
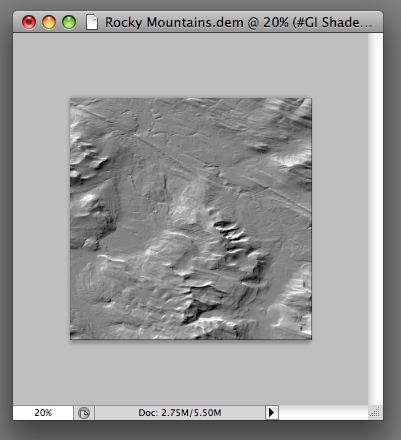
Shaded Relief Image after the original DEM file is made invisible

6) If you want to change the brightness and contrast of the produced shaded relief image, you can simply add an adjustment layer in the Layers panel.
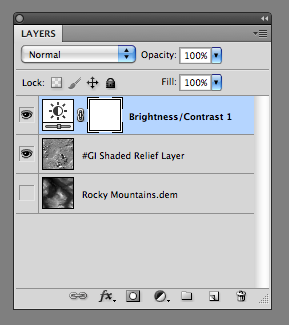
Layers Panel: Adding an adjustment layer

Simply adjust the brightness and contrast values in the Adjustments panel.
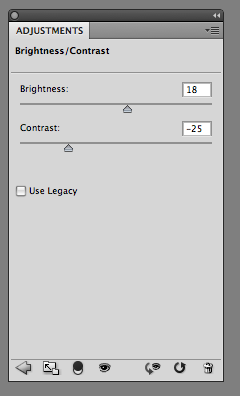
Adjustment Panel: adjusting contrast

Now, the shaded relief image is ready for your map!
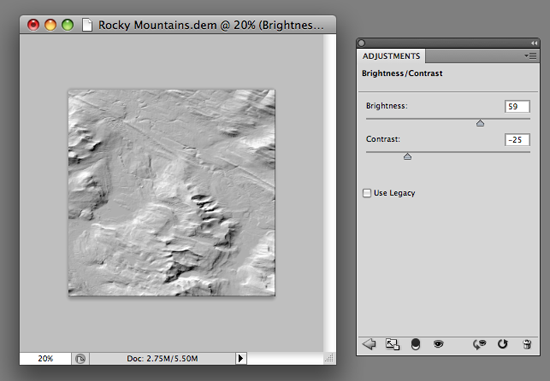
Adjusted shaded relief image

As always, when you use Geographic Imager, all the georeference information is maintained while you work with Adobe Photoshop and Geographic Imager functions. This is a great advantage when dealing with geospatial datasets.
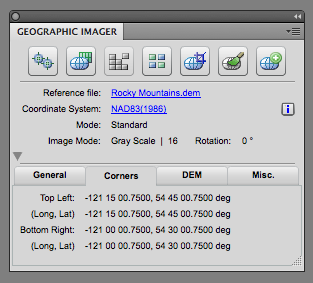
Georeference information displayed on the Geographic Imager Main Panel

One quick note: If you want to use a shaded relief image with MAPublisher in Adobe Illustrator, you may save the shaded relief image with spatial reference information. Before saving the image, go to Image > Mode > 8 Bits/Channels. It will convert the image from 16 bits to 8 bits, which is necessary when working with images in Adobe Illustrator.
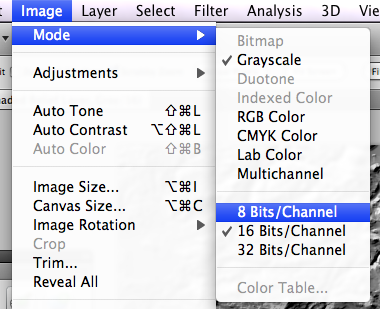
Changing the image mode from 16 bit to 8 bit

To place the image in Adobe Illustrator, use the MAPublisher “Register Image” function to align the image with your vector work.

Using these steps will add a nice texture to your map.


Leave a Reply


Blog Archive

December 2024 (2)
November 2024 (2)
October 2024 (1)
September 2024 (1)
August 2024 (2)
July 2024 (1)
September 2024 (1)
June 2024 (1)
July 2024 (1)
May 2024 (1)
April 2024 (2)
May 2024 (1)
March 2024 (2)
February 2024 (1)
January 2024 (1)
December 2023 (1)
November 2023 (2)
October 2023 (2)
September 2023 (1)
August 2023 (1)
July 2023 (3)
June 2023 (1)
February 2023 (1)
January 2023 (2)
December 2022 (1)
November 2022 (2)
October 2022 (2)
September 2022 (1)
May 2023 (1)
August 2022 (2)
July 2022 (1)
June 2022 (2)
May 2022 (1)
February 2022 (1)
January 2022 (2)
August 2022 (1)
December 2021 (3)
November 2021 (5)
October 2021 (1)
September 2021 (3)
August 2021 (2)
July 2021 (1)
June 2021 (2)
May 2021 (2)
April 2021 (2)
March 2021 (3)
April 2021 (1)
February 2021 (1)
January 2021 (1)
November 2020 (1)
October 2020 (1)
June 2020 (2)
May 2020 (1)
April 2020 (3)
March 2020 (2)
December 2019 (1)
November 2019 (2)
September 2019 (1)
August 2019 (1)
July 2019 (1)
June 2019 (3)
May 2019 (4)
April 2019 (2)
March 2019 (1)
February 2019 (2)
January 2019 (3)
December 2018 (2)
November 2018 (1)
October 2018 (1)
September 2018 (2)
August 2018 (4)
July 2018 (2)
June 2018 (1)
July 2018 (1)
June 2018 (4)
May 2018 (1)
April 2018 (2)
March 2018 (4)
February 2021 (1)
February 2018 (1)
January 2018 (1)
November 2017 (1)
October 2017 (2)
August 2017 (2)
July 2017 (1)
March 2017 (1)
February 2017 (2)
January 2017 (2)
November 2016 (1)
January 2017 (1)
November 2016 (1)
October 2016 (2)
May 2016 (1)
March 2018 (1)
April 2016 (2)
December 2015 (2)
June 2015 (1)
May 2015 (1)
April 2015 (2)
December 2014 (4)
October 2014 (2)
May 2014 (4)
February 2014 (1)
October 2013 (3)
April 2013 (1)
January 2013 (2)
August 2012 (1)
October 2012 (1)
July 2012 (3)
May 2012 (2)
January 2012 (2)
August 2011 (1)
July 2011 (2)
June 2011 (2)
May 2011 (2)
March 2011 (1)
February 2011 (1)
January 2011 (5)
December 2010 (1)
November 2010 (1)
December 2010 (1)
November 2010 (1)
October 2010 (1)
August 2010 (4)
July 2010 (2)
June 2010 (3)
May 2010 (2)
April 2010 (2)
March 2010 (2)