My Account     Contact Us     Cart

Exploring Imagery Data using Band Combinations in Geographic Imager

Captured largely by satellites, planes, or unmanned aerial vehicles (i.e., drones), imagery data reveals interesting patterns and important information on Earth’s surface processes. This information can tell us not only about the natural world around us but also how we are changing it. From deforestation, snowmelt, desertification, and water resources management, to urban development, agriculture, forestry, and national defence, the stories we can tell with imagery data have become more important than ever. With hundreds of active earth observation satellites orbiting the Earth, never before has there been more data available to work with, and entire professions have been developed to learn from the vast troves of imagery data now available. 

Although the world of imagery analysis is full of complex techniques and analytical workflows, learning the basics doesn’t have to be intimidating. We’ll show you in today’s blog, where we are looking at one of the simplest, yet most effective techniques for examining imagery data: using band-combinations to create false colour composites. With the Geographic Imager plugin for Adobe Photoshop, we will explore how you can access, import, and process multispectral imagery data to visualize some interesting patterns on Earth’s surface.
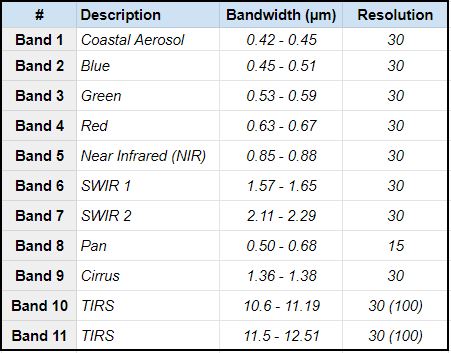
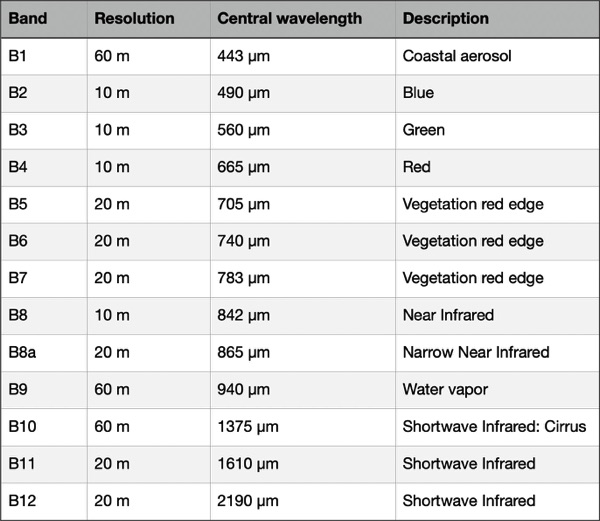
Bands and the corresponding wavelength ranges for the Landsat 8 Earth Observation Satellite. Are a variety of “visible” and “invisible” bands are captured by the sensors on-board.

When we think of satellite imagery data, we often imagine something similar to the view out the window of a plane. To our eyes from high above, the Earth’s surface is very much dominated by “natural” colours such as blue and green. This is due to our eyes having evolved to observe what we call the “visible” part of the electromagnetic spectrum. This visible component is in fact only a small part of the greater spectrum as a whole, and many satellites are designed to capture wavelengths far beyond what we can see with the unaided eye. This so-called “invisible” part of the spectrum includes ultraviolet, infrared, and near-infrared wavelengths that can be extremely important for scientists studying Earth’s surface processes. Satellites will often capture individual images at a wide range of different wavelengths and combine these in something called “multispectral imagery”. Landsat 8 is an Earth observation satellite active since 2013 and is one of the best sources of high-quality multispectral imagery data available to date. Better yet, through USGS Earth Explorer web app, users can download high-quality Landsat 8 imagery for almost anywhere on Earth.
After creating a free account on Earth Explorer, we can start looking for some data. Use the search criteria panel to specify a region of interest (you can also manually draw a search area using the map panel). In this section, we can also specify a date range, which is very useful if you wish to view a particular region at a specific date or want to see how a region may have changed over time. For this example, we are going to be looking at the area of Las Vegas, Nevada. Often referred to as an “oasis”, we want to take a look at vegetation growth in this desert city, and see just how accurate this term may be.

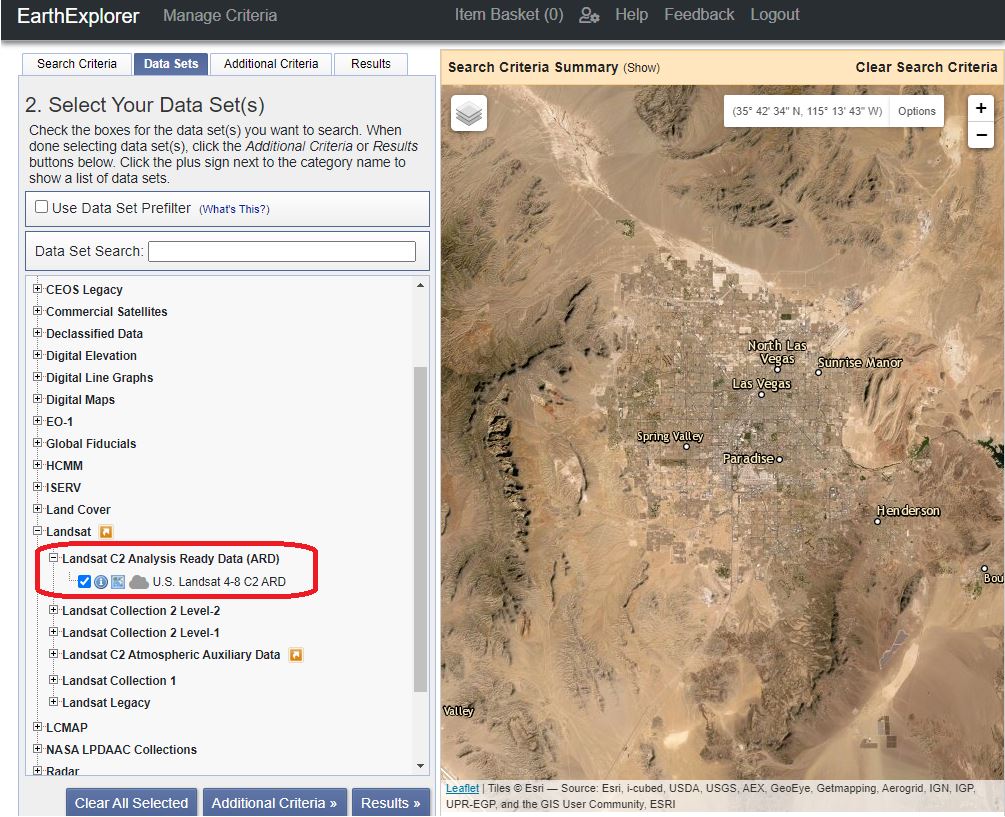
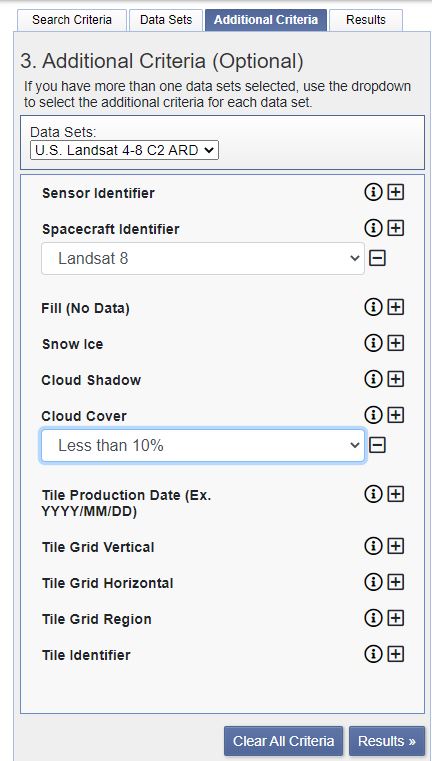
In the Datasets window, we can access different data providers for our imagery. For our needs, we want to select the Landsat C2 Analysis Ready Data (ARD). This will contain the prepared multispectral imagery we need to create a false colour composite. In the “additional criteria” section, we can specify the spacecraft (Landsat 8) and Cloud cover tolerance for our imagery data. For false colour composites, it is important to get a clear unobstructed view of the Earth’s surface, so we should aim for as little cloud cover as possible (<10%).
The Results panel now presents us with a great selection of imagery datasets for our area. We recommend examining the available datasets, and ensuring the data covers the area of interest by using the footprint icon next to each data product. With the right dataset selected, we can download the dataset we will import in Geographic Imager (choose the “Surface Reflectance Bundle” option from the download options). 
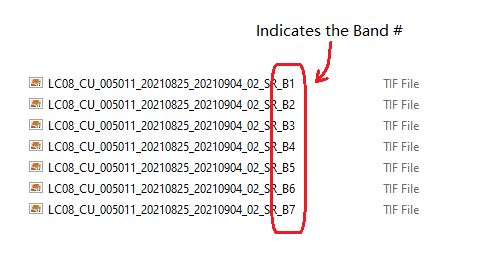
Looking at the downloaded files, you will see that several files end in a suffix indicating the “band” captured in that image (i.e suffix “_B1”, “_B2”, “_B3”, etc). These bands correspond to the specific ranges of wavelengths we discussed earlier. We will be combining several of these different images to create our composite.

Now that we have the data, Geographic Imager will make it easy to import, and edit multispectral imagery data, all while retaining accurate spatial referencing. In addition, being seamlessly integrated into Adobe Photoshop, it gives us access to powerful Photoshop tools such as adjustment layers and curves (check out this great Mapping Class tutorial by Tom Patterson on using adjustment layers to improve imagery data). We start by opening the image files corresponding to Bands 1 through 7 (files ending in suffixes “_B1” to “_B7”). 

Go to Window > Channel to open the Channels panel From the Channel panel options menu, select “Merge channels” to combine the separate images into a single composite with different bands. Set the Merge Mode to “Multichannel” and specify each channel by assigning it to its corresponding image (i.e., Channel 2> Band 2, Channel 3> Band 3, etc.). Complete this for all channels. 
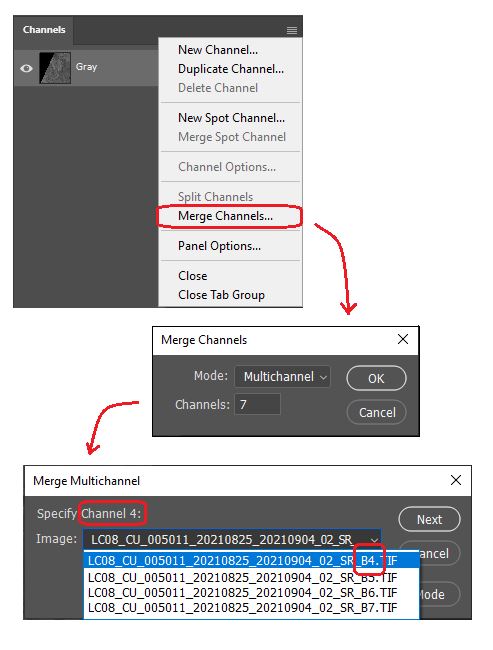
To work with our new multi-channel image, ensure the Image mode is set to Grayscale (Image> Mode> Grayscale). You may also want to rename the channels to match their spectrum component (i.e., rename “Alpha Channel 2” to “Band 2 – Blue” and so on.)
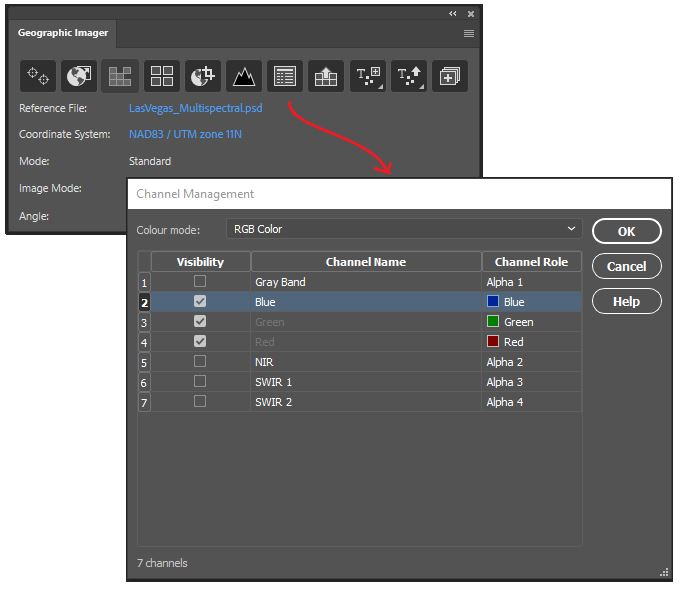
Next, open the Channel Management tool on the Geographic Imager Panel. Here we can easily modify channels to create different colour composites that match our needs. Specify the colour mode at the top of the panel to be “RGB Colour”. Next, specify the channel roles that will be used to display the image. To start, let’s go with the obvious choice. For “Band 4 – Red”, select the “Red” channel role. For “Band 3 – Green”, specify the “Green” channel role, and for “Band 2 – Blue”, select the “Blue” colour role. We call this band combination 4-3-2, referring to the bands we assign to Red, Green, and Blue respectively. This is also what is called the “natural colour” image, and will show us a view of the Las Vegas area as it would appear to our eyes (we’ve used some adjustment layers to brighten the image before displaying it).
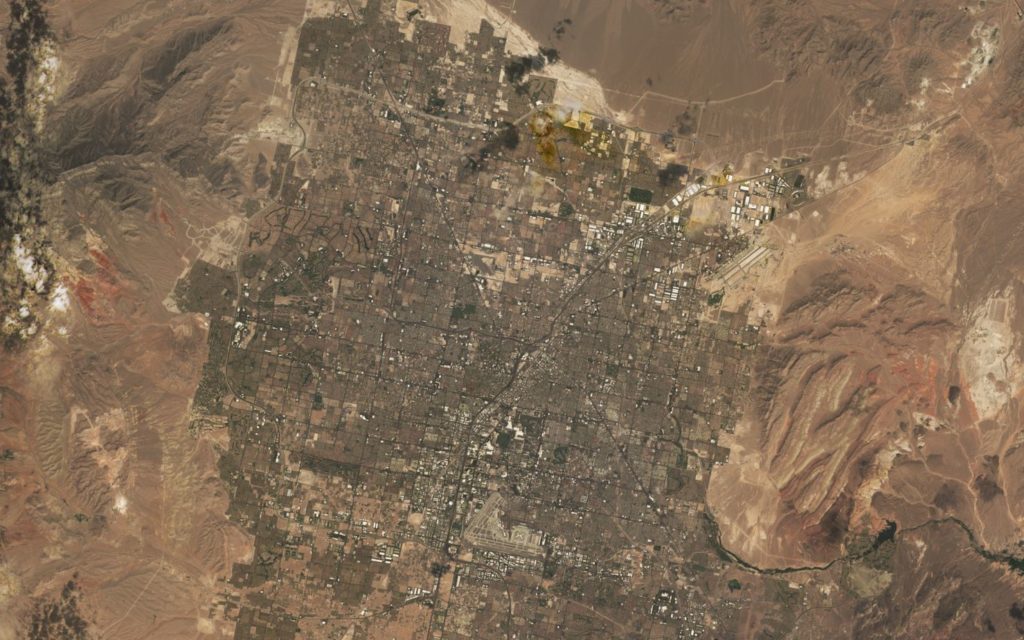
Natural Colour (4-3-2) Image of Las Vegas

Being in the middle of the desert, it’s unsurprising that our image is a mix of drab browns and greys, reflecting the mix of concrete structures, sandstone, and small shrubbery that permeate the landscape. If you look very closely, you might notice a few dark green patches, which indicate some of the many golf courses and parks that are interspersed throughout the city. In the natural colour band combination, however, only the larger areas of vegetation are easily visible, and others are generally washed out by their surroundings. If we want to get a better idea of the vegetation that persists in this desert “oasis”, we will need to apply some modifications to our imagery to create a false colour composite.
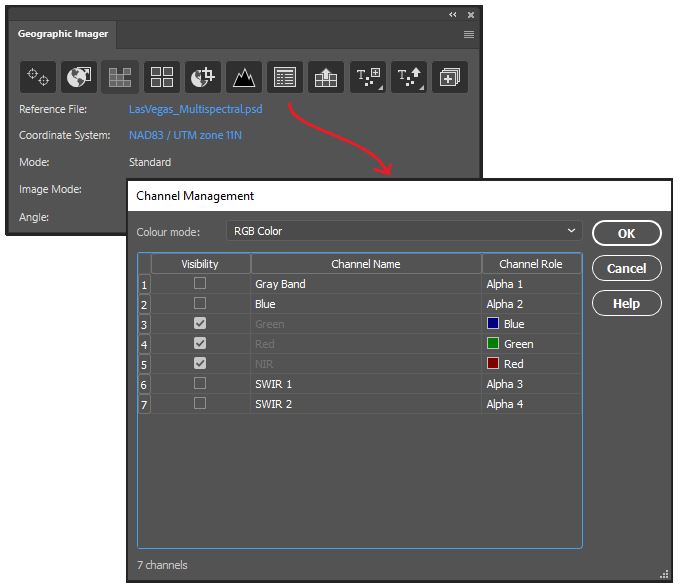
Opening the channel management tool again, this time we are going to create the band combination 5-4-3. This combination is one example of a “false colour” image and will help us to highlight the presence of vegetation in the area. 
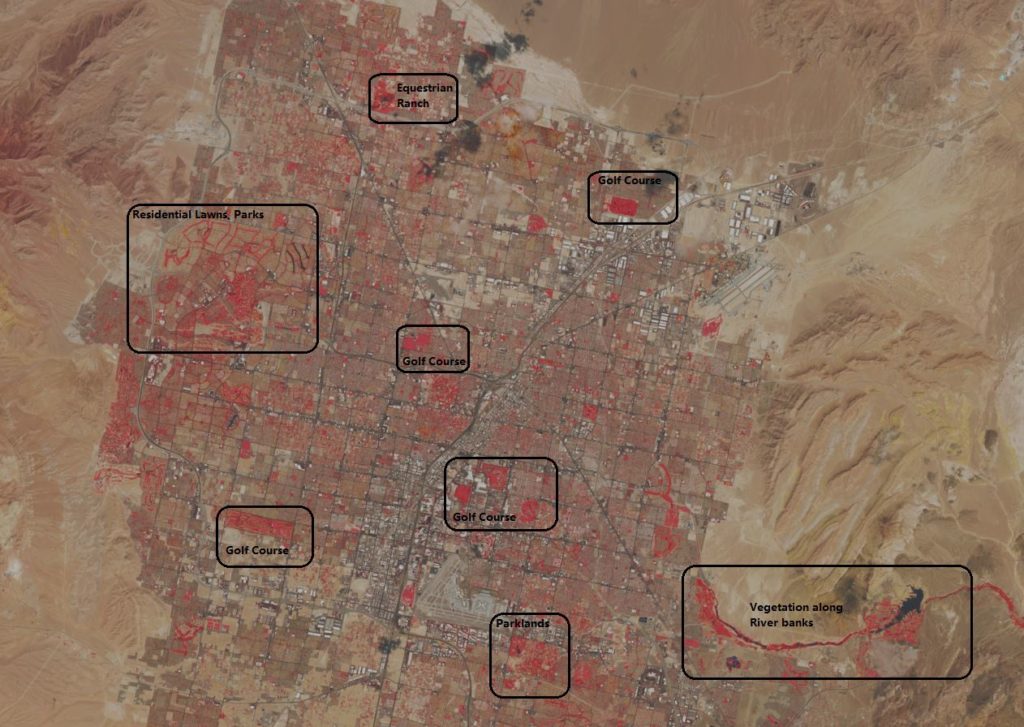
False Colour (5-4-3) Image. Note that vegetation appears as bright red.

Looking at this new image, you might see how vegetation stands out clearly as bright red in colour. Irrigated vegetation, such as that found on golf courses, parks, lawns, and crop fields stands out even more prominently. Compared to the natural colour settings, this image makes it much easier to identify vegetated areas, even small ones. Presenting the image in this way is not only more informative but also tells a story of how human intervention affects our environment. The highly structured shape and location of most of these vegetated areas indicate a high level of human involvement, especially when compared to the more “natural” areas outside the city. This provides strong hints at the massive role water management and irrigation have in overcoming an otherwise arid, harsh, growing environment.
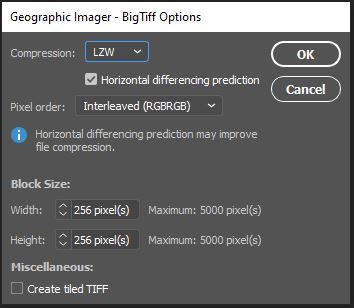
ou may want to save the file as a Photoshop document (PSD/PSB) in order to work with the image again later or explore different band combinations on another machine. Starting with Geographic Imager 6.4, internal georeferencing is now embedded directly within a saved Photoshop document. This reduces the need to retain an external spatial referencing file when the project is re-opened at a later date. Alternatively, we can also Export to one of several different spatial image formats. To demonstrate, we’ve exported to a GeoTIFF format, which will also retain internal georeferencing. When selecting “Save As.. -> “Geographic Imager – BigTIFF”, a dialogue window will open that allows us to configure compression, pixel order and block size for our exported image. Note that GeoTIFF formats allow us to retain our Image Channels if we wish (but this will increase the file size). Click OK and the image is now exported for future use.

There are many different band combinations you can use to explore and analyze different patterns on Earth’s surface. We only examined two very specific types in this demonstration, but below we have provided a list of several other common Landsat 8 band combinations, as well as their use-cases.
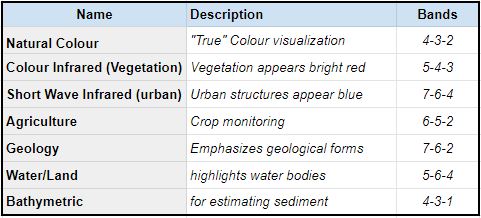
The above band combinations are specific to Landsat 8 Imagery. Different satellites will have alternative band combinations.

Try out a few combinations and see what types of interesting patterns you can observe. With the Channel Management tool in the Geographic Imager plugin for Adobe Photoshop, exploring band combinations and false-colour composites with imagery data is a breeze!
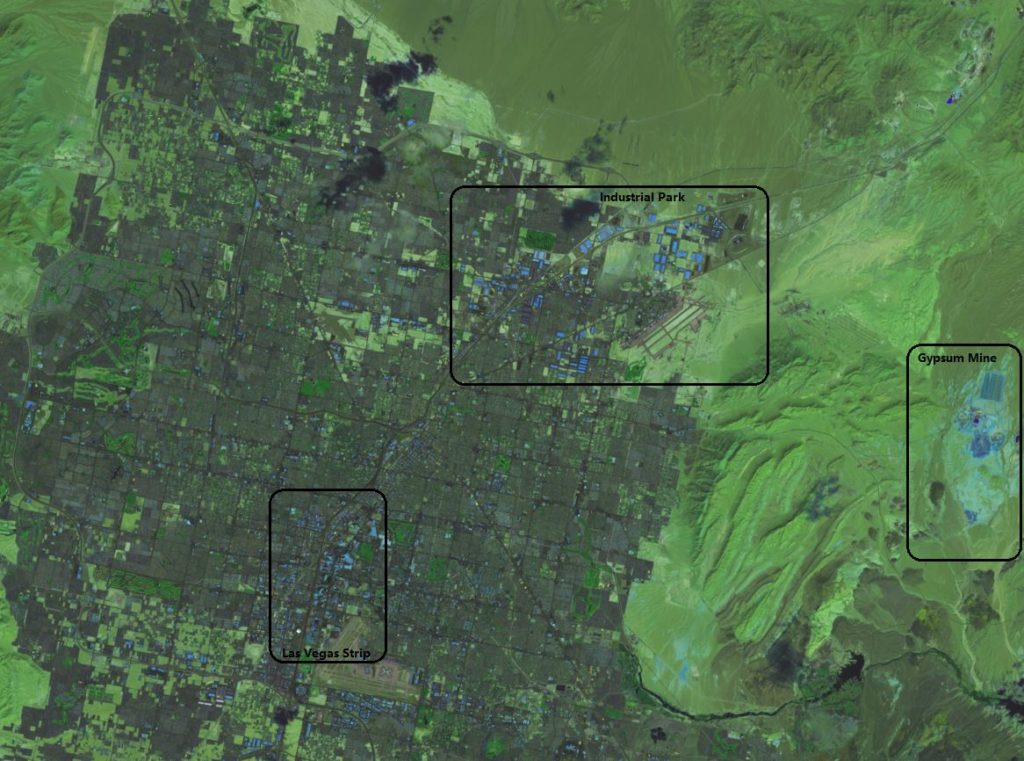
The above false colour composite uses Band Combination 7-6-4. This combo works best for highlighting human-made developments and structures. Urban areas, buildings and structures will appear as bright purple to blue in this combination.

Adobe MAX 2021 – Virtual Event


The Creativity Conference
Oct. 26–28, 2021

Expect the unexpected.

Avenza Systems is a Silver Sponsor at this year’s Adobe MAX virtual conference!

Adobe MAX 2021 will be held October 26–28, 2021. And once again, it’s virtual and totally free.

Be sure to mark your calendar so you don’t miss the creative event of the year. Join us for three full days of inspiring speakers and ideas, all the latest tools and updates, tips and tricks to take your work to the next level, and everything you need to gain inspiration and fuel your creative fire.

Be sure to check out our sponsor page for giveaways and other exciting news!

For more information, go to max.adobe.com.

Avenza Releases Geographic Imager 6.4 for Adobe Photoshop

Toronto, ON, September 20th, 2021 – Avenza Systems Inc., producers of the Avenza Maps® app for mobile devices and geospatial plugins for Adobe® Creative Cloud®, including MAPublisher® for Adobe Illustrator®, is pleased to announce the release of Geographic Imager® 6.4 for Adobe Photoshop®. This latest version is fully compatible with the most recent version of Adobe Photoshop 2021 and introduces the ability to store embedded georeferencing within the saved Photoshop document format. Geographic Imager 6.4 also brings forward scripting support for the export of point, text, and vector layers, updated map store upload options, coordinate system updates, and a host of bug fixes and engine enhancements.

Enriching the Geospatial Image Editing Process

Geographic Imager for Adobe Photoshop delivers an all-encompassing solution to import, edit, and export geospatial images such as aerial and satellite imagery. Work with digital elevation models, GeoTIFFs, and other popular GIS image formats while using Adobe Photoshop features such as transparencies, filters, cropping, and image adjustments; all while maintaining georeferencing and support for hundreds of coordinate systems and projections.

New features of the Geographic Imager 6.4 plugin for Adobe Photoshop include:

  • Georeferenced Photoshop documents: Users can now store embedded georeferencing within a saved PSD/PSB. This reduces the need for retaining separate or external reference files.
  • Scripting support for export of vector layers: This will allow the export of vector layers, points, and text to be recorded as actions and provides functionality to script these processes.
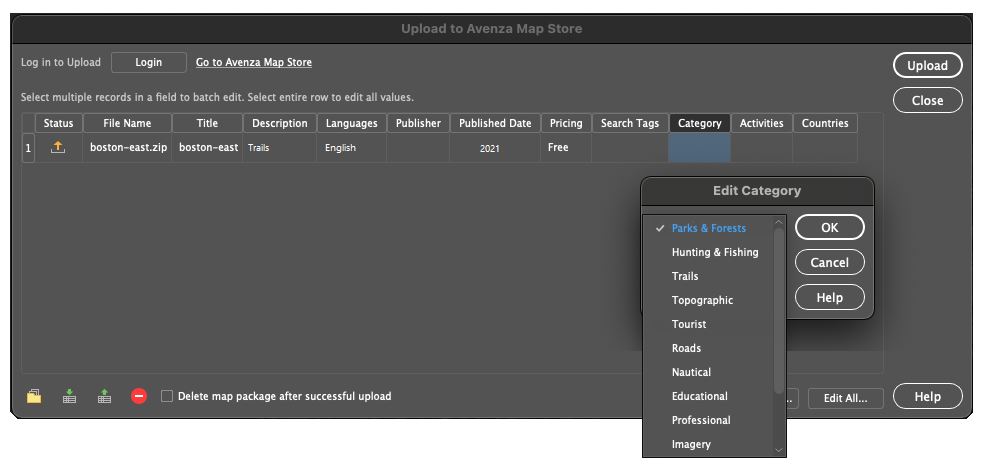
  • New Avenza Map Store categories: The new categories used for browsing maps on the Avenza Map Store have been added when using the  ‘Upload to Avenza Map Store” functionality.
  • Updated coordinate systems: Engine enhancements including an updated coordinate system library.

Geographic Imager 6.4 is immediately available and free of charge to all current Geographic Imager Maintenance Program members and starts at US$349 for non-maintenance upgrades. New fixed licenses start at US$749. Geographic Imager Basic Edition licenses start at US$99. Academic, floating, and volume license pricing is also available. For more information, visit www.avenza.com/geographic-imager.

More about Avenza Systems Inc.

Avenza Systems Inc. is an award-winning, privately held corporation that provides cartographers and GIS professionals with powerful software tools to make better maps. In addition to desktop mapping software, Avenza offers the mobile Avenza Maps app to sell, purchase, distribute, and use maps on iOS and Android devices. For more information, visit www.avenza.com.

For further information contact:  416-487-5116 – info@avenza.comwww.avenza.com

What’s new in Geographic Imager 6.4

What’s New in Geographic Imager 6.4

Avenza is pleased to announce the release of Geographic Imager® 6.4 for Adobe Photoshop®. This version is fully compatible with the latest version of Adobe Photoshop 2021. The release also introduces the ability to retain embedded georeferencing within saved Photoshop documents. We are also excited to provide scripting support for the export of point, text, and vector layers, updated map store upload options, new coordinate system support, and a host of bug fixes and engine enhancements.

Here is what you can expect with the latest Geographic Imager 6.4 release:

Georeferenced Photoshop Documents and Photoshop BIG files

We know that easily and efficiently importing and processing georeferenced imagery data directly within Adobe Photoshop make Geographic Imager the go-to platform for your imagery editing needs. With the release of Geographic Imager 6.4, working with georeferenced imagery is now simpler than ever. We have introduced the ability to retain embedded georeferencing information directly within a saved Photoshop Document (PSD). Geographic Imager will now store, and automatically read georeferencing specifications upon opening Photoshop documents. This reduces the need to retain an external reference file and means users will not have to specify this source reference information upon opening the file. Embedded georeferencing now works with all support images contained in Photoshop Documents, as well as very large georeferenced images contained in Photoshop BIG (PSB) files.

Upload Options: Avenza Map Store Categories

For users wishing to share or sell their maps on the Avenza Map Store, we have updated the “Upload to the Avenza Map Store” options to include the new Map Store categories. Map Store categories such as Parks & Forests, Trails, and Topographic are organized to enhance the search experience on the Map Store and ensure your high-quality map products reach the right users. When exporting from Geographic Imager to the Avenza Map Store, users will be provided an option to select one of 13 specific categories.

Scripting Support for Exporting Vector Layers

For handling repetitive imagery processing tasks, our users often employ the already powerful automation and scripting tools available in Adobe Photoshop. With Geographic Imager 6.4, we have introduced scripting capabilities for exporting vector layers. This means exporting vector points, lines, polygons, and text within Geographic Imager can now be recorded in the Adobe Photoshop Action panel. This new functionality allows users to script and automate export processes for their geospatial imagery.

Improved Coordinate System Library

For this release, we worked to improve the Geographic Imager engine that ensures our users can continue their work in a truly seamless, powerful, efficient, geospatial image-editing environment. This release includes performance enhancements, user interface improvements, and a host of bug fixes. Additionally, we have built on our existing coordinate system catalog with the addition of several new and updated projection and coordinate systems. These exciting additions include the Natural Earth and Natural Earth 2 Projections created by Tom Patterson. 

Get it today!

All active maintenance subscribers can upgrade to Geographic Imager 6.4 today for free. Users who don’t have active maintenance or are on a previous Geographic Imager version can still upgrade.

Mapping Class: Work with Sentinel-2 Imagery in Geographic Imager – Part One, with Tom Patterson

Welcome to the latest edition of Mapping Class! The Mapping Class tutorial series curates demonstrations and workflows created by professional cartographers and expert Avenza software users. In this month’s edition, we welcome Tom Patterson, a map-maker extraordinaire and a true household name in the cartography world. Today Tom is sharing with us a demonstration showing how he works with Sentinel-2 Imagery Data using Geographic Imager and Adobe Photoshop. Tom uses a new dataset that that represents a “pretty difficult” image to process and offers an excellent look at how to create beautiful natural colour images from satellite data.

Part One of this exciting walkthrough covers the techniques Tom uses for accessing and importing satellite imagery data, as well as his approach to colour correction using some of the powerful built-in image editing tools in Adobe Photoshop. Tom has produced video notes below to help you follow along! Look out for Part Two, coming in next months edition of Mapping Class!

***

Work with Sentinel-2 Imagery in Geographic Imager: Part One
by Tom Patterson (Video notes adapted from original)

This tutorial explains how to process Sentinel-2 satellite data, released by the European Space Agency for free, into natural colour images. Beautification is the goal—nature often can use a little help when using satellite images for maps and graphical presentations.

To do this tutorial you will need Adobe Photoshop and Avenza Geographic Imager. Trial versions for geographic imager can be found here. For this tutorial, you should also have intermediate Photoshop skills, a good internet connection, and a computer with plenty of RAM.

Getting the data

The US Geological Survey distributes Sentinel-2 data on the EarthExplorer data portal. You can also download Sentinel-2 on the Copernicus Open Access Hub, although I find EarthExplorer easier to use.

1) Downloading data from EarthExplorer requires that you first sign in as a registered user.

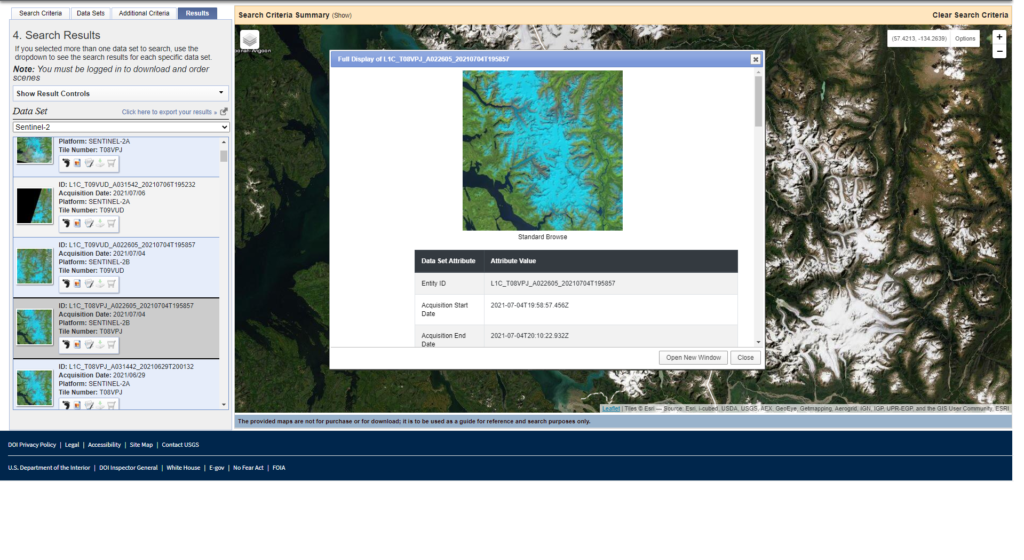
2) After you sign in, use the “Search Criteria” tab in the upper left to specify a point of interest. You can also draw a polygon on the map to specify a larger search area.

3) Click the “Data Sets” tab next. From the long list of data types, select “Sentinel-2.”

4) The EarthExplorer portal offers useful tools for narrowing your search. For example, you can filter by acquisition date and cloud cover. Sentinel-2 image extents are viewable as transparent map overlays. 

5) Click the “Results” tab to peruse the available images. Then click the image thumbnails to see larger image previews in false color. Scrolling down from the image previews reveals additional metadata

To download a scene from the search results list, click the “Download Options” icon. You will then see these two download options:

● L1C Tile in JPEG2000 format (XX MB)

● Full Resolution Browse in GeoTIFF format (XX MB)

Download both.

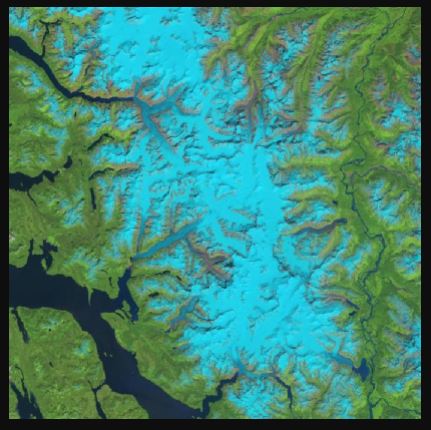
7) The Full Resolution Browse in GeoTIFF format is a false-color image (bands 11, 8A, and 4) at 20-meter resolution.

8) Decompress the L1C Tile in JPEG2000 format archive. It contains the raw Sentinel-2 bands and a true-color image. You will need to drill through multiple folders to get to these data 

Importing the data

Because Photoshop does not natively import JPEG2000 files, you will need to use a Geographic Imager to import the Sentinel-2 data. The advantage of Geographic Imager over other plugins is that it preserves georeferencing and allows you to export manipulated Sentinel-2 images as GeoTIFFs.

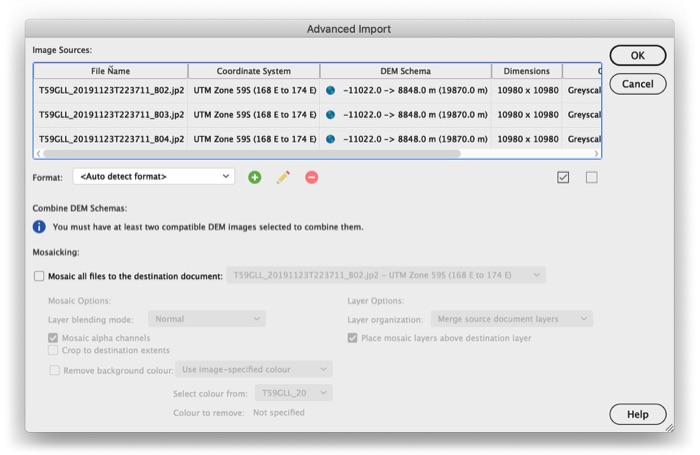
1) In the Photoshop drop menu, go to File/Import/GI: Advanced Import

2) Select one or more Sentinel-2 bands to import (in this case, we want Bands 4, 3, and 2 which correspond to our Red, Green, and Blue bands) and click OK. Importing could take a minute or two to complete. Each Sentinel-2 band will open as a separate Photoshop file. That’s it.

Colour Correction

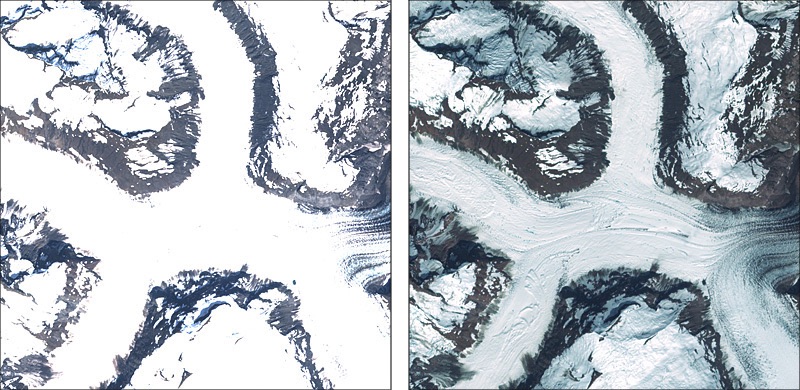
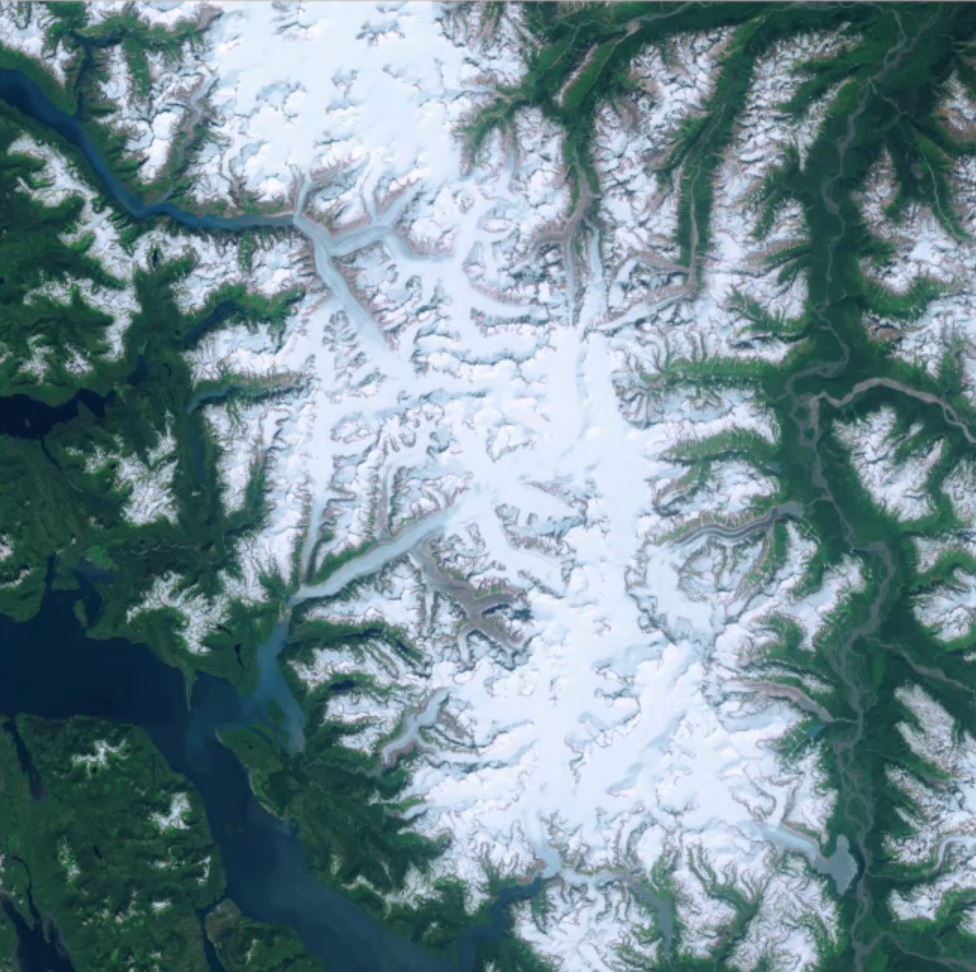
The premade True Color Images are convenient to obtain, and you can easily adjust them to create acceptable results. However, they have an Achilles heel: snow- and ice-covered landscapes. Automated processing removes the very lightest tones, rendering them as empty white (below, left). In order to depict subtle details in snowy terrain, one must build the satellite image from scratch using the raw data in bands 4, 3, and 2 (below, right).

1) Use Geographic Imager to open bands 4, 3, and 2 (File/Import/GI: Advanced Import…). The import will take a couple of minutes to complete, and the three bands will open as separate Photoshop files.

2) With one of the Photoshop files active, go to the flyout menu in the upper right corner of the Channels window. Select Merge Channels…

3) In the Merge Channels window, change the mode to RGB Color and specify 3 channels.

4) Another window will pop up. Make sure that band 4 is the red channel, band 3 is the green channel, and band 2 is the blue channel. Then click okay.

5) Photoshop will then ask whether you want to save each of the three bands. Don’t save them. You will then see the merged 16-bit RGB image, which is mostly gray

Using Curves

Now the fun begins. Compared to Levels adjustments that are linear, Curves adjustments are non-linear, giving you more control over discrete portions of the tonal range in an image. They are a little tricky to use at first, but the precise results that you can achieve with this command make learning it very worthwhile.

1) Apply a Curves adjustment layer and adjust the tonal range of the image taking care to leave some value in the snow patches. I often apply two or more Curves adjustment layers, one on top of the other, to fine-tune the tonal balance. With 16-bit images, you can stretch the tonal range without worrying about banding artifacts.

2) Save your applied curves as adjustment layers so you can save and re-use them for later. This is especially important when you start mosaicing imagery data (coming in part two!) and need to ensure curves are applied consistently across multiple images.

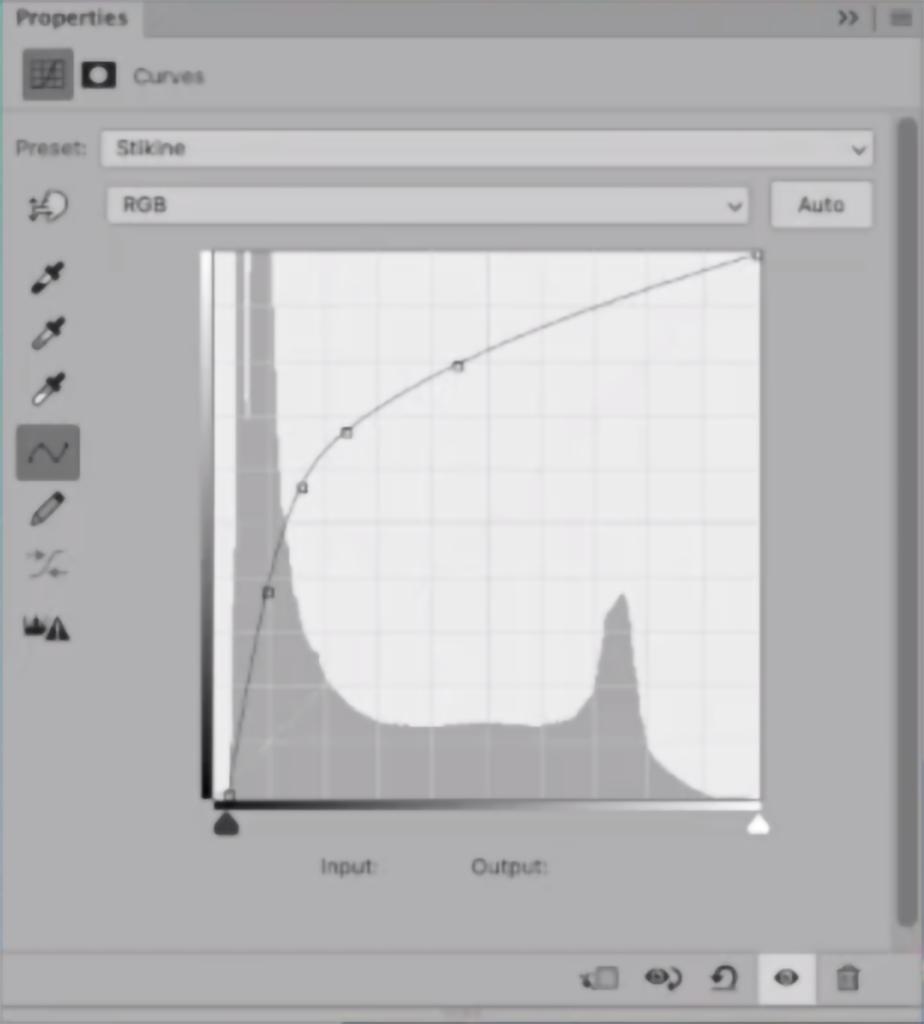
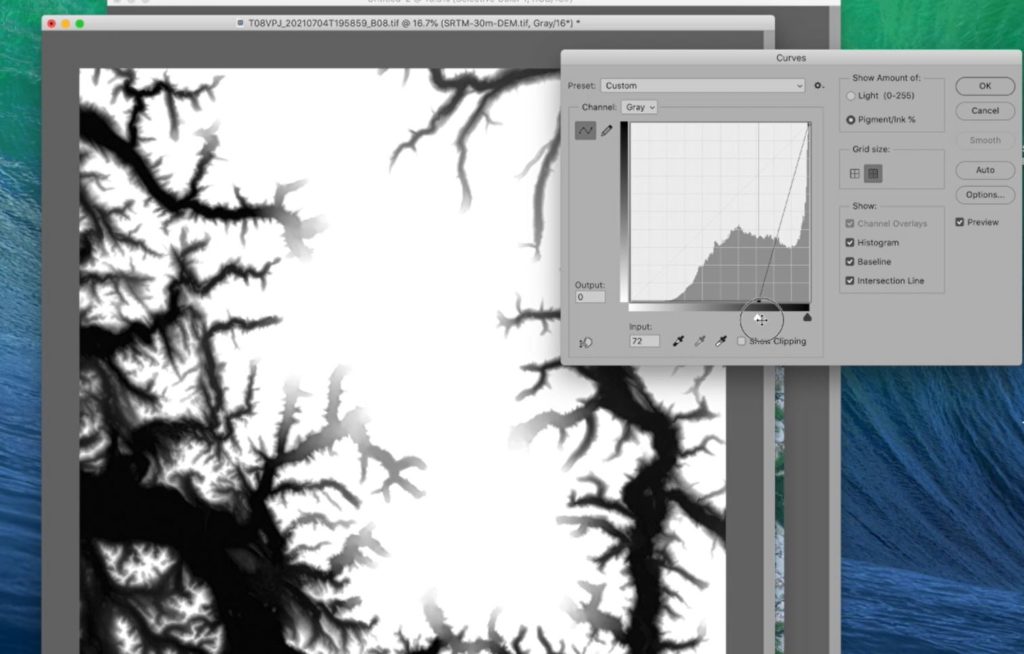
Below is the curve that I used to adjust the image. The histogram shows the distribution of light and dark values. Moving the lower-left end of the curve to the right lightened dark trees. Moving the top-right end down added a slight amount of tone to the white snow. Both of these moves decreased overall contrast.

Touch-up with the False Colour Image

We want to add a bit more eye-catching vibrance to our image. We can do that by utilizing the included false colour imagery and using the colour properties and blending tools to really make the mountainous terrain pop. 

1) Since we need the false colour imagery to match the resolution of our RGB image, we need to upscale it. This can be done using the image sizing properties and resampling using the “Preserve Details” setting.

2) Overlay this upscaled false colour image over top of the RGB layer. You can then adjust the blending modes to create a nice vibrant image. In this case, I use the “Soft Light” blending mode, which is great for making the alpine terrain really stand out.

3) Create a selective colour adjustment layer to touch out individual colour tones in the image. For example, I try to remove much of the yellow tones in the image, as yellow tones are atypical for the “cold” alpine-like terrain we find in this image. 

Coming up in Part Two:

The land areas in this image now stand out quite well. They look quite a bit more vibrant than the raw data and offer a bit better tonality than what we find in the automatically generated true-colour image included in the download. What we can do next is work on making the water areas stand out as well. I’ll show you how you can use the mosaic tool in Geographic Imager to work with elevation data to create layer masks that make adjusting water areas easy.

***

About the Author

Tom Patterson worked as a cartographer at the U.S. National Park Service, Harpers Ferry Center until retiring in 2018. He has an M.A. in Geography from the University of Hawai‘i at Mānoa. Presenting terrain on maps is Tom’s passion. He publishes his work on ShadedRelief.com and is the co-developer of the Natural Earth dataset and the Equal Earth projection. Tom has served as President and Executive Director of the NACIS. He is now Vice-Chair of the International Cartographic Association, Commission on Mountain Cartography.

Avenza Map Competition 2021

The competition results are in! View the winners here.

Have you designed a beautiful map that is worthy of showing? Enter our map competition for a chance to compete against other cartographers and mapping professionals and have your work featured in our map gallery. The competition consists of two categories: Open and Student, with two sets of exciting prizes. The deadline for submissions is December 3 (5pm EST), 2021.

Maps from all industries are encouraged to enter. Some of the various map themes are (but are not limited to): thematic, topographic, recreation and tourism, land and asset management, planning and design, natural resources, health care, analysis, education, economic and commerce, and public safety.

For full competition details and to submit your map, go to the competition page here, or visit avenza.com/map-competition/

NACIS 2021 Annual Meeting – Oklahoma City, OK

NACIS 2021
Oklahoma City, OK
October 13-16, 2021

Make your plans now to participate in the Annual Meeting of the North American Cartographic Information Society in Tacoma, Washington. Join professionals and enthusiasts from government, commercial, and not-for-profit groups along with academics, scholars, map/GIS librarians, artists, technologists, and students in the society’s 41st Annual Meeting.

Presentation

Cartography in Adobe CC – MAPublisher and Geographic Imager Advancements

By Nick Burchell, Spencer Elford, Avenza Systems Inc.

This presentation will provide an overview of advancements in MAPublisher and Geographic Imager since NACIS 2020. Topics will include advancements to our coordinate system library, great new import formats, and numerous workflow enhancements to both applications. We’ll also provide an update on new features coming soon.

News Archive