My Account     Contact Us     Cart

Avenza Introduces Geospatial PDF App for Apple iOS

– Geospatial PDF reader with GPS positioning to be available soon for iPad and iPhone –

Toronto, ON, July 12, 2010 – Avenza Systems Inc., producers of MAPublisher® cartographic software for Adobe Illustrator® and Geographic Imager® spatial tools for Adobe Photoshop® is pleased to announce the upcoming availability of the first and only geospatial PDF application for Apple iOS devices including the iPad, iPhone and iPod Touch platforms.

Complimenting the geospatial PDF authoring capabilities of MAPublisher for Adobe Illustrator (soon to also be available for Geographic Imager for Adobe Photoshop), the Avenza geospatial PDF app for iOS devices will be the first of its kind designed specifically for non-GIS savvy users. It will give field personnel the power to interact with geo-registered PDF maps and images directly from their iOS device with viewing performance levels well above any currently available PDF viewing applications.

“Our MAPublisher and Geographic Imager applications for Adobe Creative Suite offer the only available methods for authoring geospatial PDF documents within the Adobe environment and we are now delighted to extended the power of geospatial PDF viewing and interaction to Apple iOS devices.” said Ted Florence, President of Avenza. “For the first time, publishers and users of geospatial PDF documents will now have complete access to them on their iPhones, iPads and iPod Touches which is an exciting proposition for anyone working with these types of documents in field work or navigation”, he added.

The Avenza geospatial PDF app for Apple iOS will offer the following capabilities

  • Access and load maps through iTunes File Sharing and over a Wi-Fi or cellular network
  • View your current location on the PDF map using the built-in GPS (iPad and iPhone only)
  • Display the location of any point on the map in world units (latitude and longitude)
  • Quickly view, zoom and pan maps using gestures (pinch, drag and flick, double tap)
  • Optimized for fast loading and refreshing of large maps and spatial documents
  • Record and export way-points and notes
  • Measure distances


Visit https://avenza.com/geospatial-pdf-app for more information.

More about MAPublisher and Geographic Imager

MAPublisher for Illustrator is powerful map production software for creating cartographic-quality maps from GIS data. Developed as a suite of plug-ins for Adobe Illustrator, MAPublisher leverages the superior design capabilities of this leading graphic design software.

Geographic Imager is powerful software for working with spatial imagery in Adobe Photoshop that leverages the superior image editing capabilities of this raster-based image-editing software. For more information on these products and the Avenza geospatial PDF app visit the Avenza website at www.avenza.com

More about Geospatial PDF

With the release of Adobe Acrobat 9 and Adobe Reader 9 a new geospatial feature set was introduced to the Adobe PDF specification. Geospatial PDF files are PDF documents that contain geospatial information such as real world location and/or GIS attributes. Geospatial PDF documents can be created in some GIS applications such as ArcGIS and Mapinfo and from within Adobe Illustrator and Adobe Photoshop with the aid of the MAPublisher and Geographic Imager plugins, respectively. The geospatial data contained in a geospatial PDF document may be accessed and used (for example to locate a specific point or measure distances) without the aid of any additional plugins, using tools found natively within Adobe Reader 9 and Acrobat 9.

More about Avenza Systems Inc.

Avenza Systems Inc. is an award-winning, privately held corporation that provides cartographers and GIS professionals with powerful software tools for making better maps. In addition to software offerings for Mac and Windows users, Avenza offers value-added data sets, product training and consulting services. Visit www.avenza.com for more details.

Avenza Announces Terrain Shader Functionality for Adobe Photoshop

– New Geographic Imager® version to include ability to colourize and shade DEM files –

Toronto, ON, July 12, 2010 – Avenza Systems Inc., producers of MAPublisher® cartographic software for Adobe Illustrator and Geographic Imager® spatial tools for Adobe Photoshop® is pleased to announce that the upcoming release of Geographic Imager, version 3.2, will include the ability to dynamically apply terrain shading and colourization to digital elevation models within Adobe Photoshop.

The Geographic Imager Terrain Shader functionality will be included as a standard feature in the upcoming release.

“The addition of a terrain shading function to Geographic Imager is a natural extension to our Adobe Photoshop spatial imaging toolset” said Ted Florence, President of Avenza. “For the first time, users will be able to easily and quickly import a DEM, apply colours and shades based on elevation and even apply a specific light source position and intensity to achieve a specific shading effect, all within Adobe Photoshop. This is a very powerful proposition for all geospatial image and DEM users and further extends the value of Adobe Photoshop as a bona fide spatial image processing platform.” he added.

Features of the Geographic Imager Terrain Shader

  • Easily generate custom colour maps or use predefined ones
  • Use Photoshop gradients to colorize DEM images specifying elevation intervals
  • Create shaded relief easily with intuitive controls
  • Adjust light source position and intensity
  • Import existing Photoshop gradients to use as colour maps
  • Assign elevations to gradients and save them for reuse


A sneak preview of this new functionality is available on the Avenza YouTube Channel: http://www.youtube.com/AvenzaTutorials

More about Geographic Imager for Adobe Photoshop

Geographic Imager is powerful software for working with spatial imagery in Adobe Photoshop that leverages the superior image editing capabilities of this raster-based image-editing software and transforms it into a powerful spatial imagery editing tool. Work with satellite imagery, aerial photography, orthophotos, and DEMs in geotiff and other major GIS image formats using Adobe Photoshop features such as transparencies, filters, and image adjustments while maintaining georeferencing and support for hundreds of coordinate systems and projections.

Geographic Imager 3.2 will be available to both Mac and Windows users in Q3, 2010.

More about Avenza Systems Inc.

Avenza Systems Inc. is an award-winning, privately held corporation that provides cartographers and GIS professionals with powerful software tools for making better maps. In addition to software offerings for Mac and Windows users, Avenza offers value-added data sets, product training and consulting services. Visit www.avenza.com for more details.


Avenza Announces Geospatial PDF Export from Adobe Photoshop

– New Geographic Imager® version to support creation of spatially accurate PDF files –

Toronto, ON, July 12, 2010 – Avenza Systems Inc., producers of MAPublisher® cartographic software for Adobe Illustrator® and Geographic Imager® spatial tools for Adobe Photoshop® is pleased to announce that the upcoming release of Geographic Imager, version 3.2, will include the ability to export geospatial PDF documents from any supported spatial image source or scanned map document.

Geospatial PDF export functionality will be included as a standard feature with the upcoming Geographic Imager 3.2 release and will offer complete support for the Adobe geospatial PDF specification which was released with Adobe Acrobat 9.

“Following the introduction of geospatial PDF authoring capabilities for Adobe Illustrator late last year with our MAPublisher 8.2 release, we are delighted to announce that geospatial PDF authoring will now be possible from within Adobe Photoshop with the upcoming Geographic Imager 3.2 release,” said Ted Florence, President of Avenza. “For the first time, users will be able to easily convert a wide variety of spatial image formats, including GeoTIFF and MrSID, to spatially-aware PDF files without the aid of specialized GIS software. These geospatial PDFs can be shared with anyone using Adobe Acrobat Reader 9 or better and can retrieve location data, measure distances and generally interact with the image in a geospatial manner.” he added.

Features of the Geographic Imager Geospatial PDF Exporter

The Geographic Imager geospatial PDF exporter offers the ability to generate Adobe Acrobat PDF files that contain all the cosmetic and geospatial characteristics of the original image, such that within Adobe Acrobat the following functionality can be performed without the aid of any special tools, plugins or other special extensions:

  • View map locations in various coordinate systems including decimal degrees, DMS, Military Grid and more.
  • Find a location in a map and mark it with a comment.
  • Measure distances on a map using real-world units (miles, kilometers, feet, etc.).

More about Geographic Imager for Adobe Photoshop

Geographic Imager is powerful software for working with spatial imagery in Adobe Photoshop that leverages the superior image editing capabilities of this raster-based image-editing software and transforms it into a powerful spatial imagery editing tool. Work with satellite imagery, aerial photography, orthophotos, and DEMs in geotiff and other major GIS image formats using Adobe Photoshop features such as transparencies, filters, and image adjustments while maintaining georeferencing and support for hundreds of coordinate systems and projections.

Geographic Imager 3.2 containing the new geospatial PDF authoring functionality will be available to both Mac and Windows users in Q3, 2010.

More about Geospatial PDF

With the release of Adobe Acrobat 9 and Adobe Reader 9 a new geospatial feature set was introduced to the Adobe PDF specification. Geospatial PDF files are PDF documents that contain geospatial information such as real world location and/or GIS attributes. Geospatial PDF documents can be created in some GIS applications such as ArcGIS and Mapinfo and from within Adobe Illustrator and Adobe Photoshop with the aid of the MAPublisher and Geographic Imager plugins, respectively. The geospatial data contained in a geospatial PDF document may be accessed and used (for example to locate a specific point or measure distances) without the aid of any additional plugins, using tools found natively within Adobe Reader 9 and Acrobat 9.

More about Avenza Systems Inc.

Avenza Systems Inc. is an award-winning, privately held corporation that provides cartographers and GIS professionals with powerful software tools for making better maps. In addition to software offerings for Mac and Windows users, Avenza offers value-added data sets, product training and consulting services. Visit www.avenza.com for more details.

Styling a MAPublisher Scale Bar

After generating a scale bar, it is placed in a MAP Legend layer. You can accept the default look of it, but majority of users will want to customize and style it to match their map.

Now I’ve just generated a simple scale bar. If you expand the Legend layer, you can see the object “MAPublisher Scalebar” is placed within it. This is a special object generated by MAPublisher and there is currently a dynamic link between the MAP View information (i.e. spatial information) and the scale bar object.

Generated Scale bar in the MAP Legend layer

In order to make a custom scale bar, you will have to break the dynamic link between MAPublisher and the scale bar object. In your own workflow, it’s important that you setup the scale before breaking the link because it will not rescale dynamically after the link is broken. Break the link by expanding the generated object.

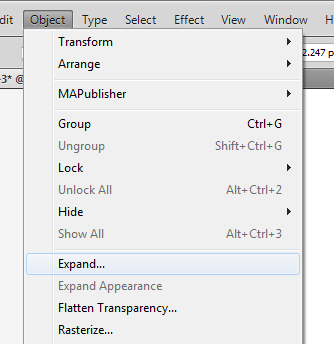
From the main menu, choose Object > Expand.

From Adobe Illustrator Menu, Object > Expand

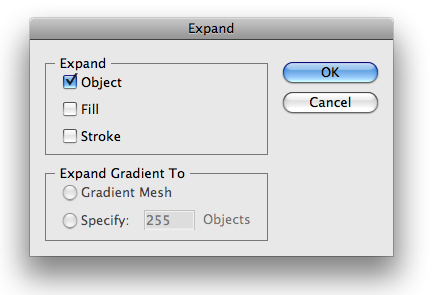
In the Expand dialog box, click the “Object” check box, then click OK.

Expand diaog window

The result: the object <MAPublisher Scalebar> is replaced by an object called <Group> in the Layers panel. The connection between the scale bar object and MAPublisher is removed. The art in the scale bar object simply became grouped objects.

Expanded Scale Bar Object

At this point, select objects in the group and change its colors and lines by using the direct selection tool Adobe Direct Selection tool. The direct selection tool allows you to select individual object even if select objects is a part of a <Group> object.

If you are more comfortable with the selection tool Adobe Illustrator Selection Tool, you will want to read the suggestion below. It works, too.

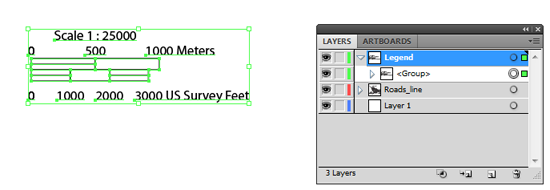
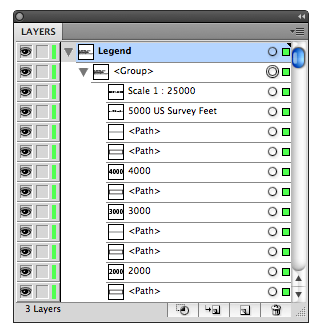
Take a look at the Layers panel again more closely. The screen capture of the Legend layer above shows that there is a <Group> object under the “Legend” layer. When the object tree under the “Legend” layer is expanded, you can see another <Group> object nested within a <Group> object. (a <Group> object containing a <Group> object). Since all the objects are still grouped, you can simply “ungroup” the art.

Expanded scale bar in the Layers panel

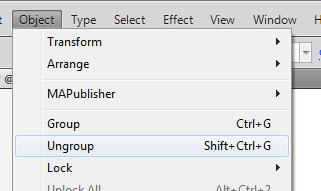
Select the <Group> object (i.e. the scale bar object for this example), then from the main menu, choose Object > Ungroup.

Adobe Illustrator menu: Ungroup

When you ungroup the object once, you now see only one <Group>. This <Group> object contains all the text, lines, and area objects composing a scale bar object.

Ungroup Once

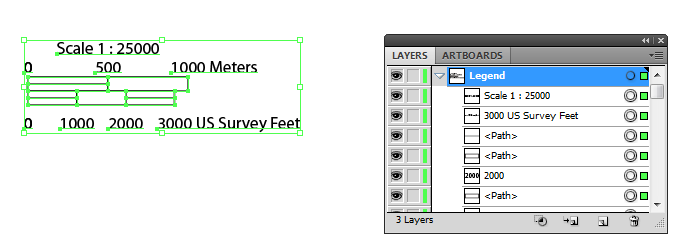
Now, ungroup the object once more. Finally you do not see the object <Group> anymore under the “Legend” layer. It indicates that every object in the layer can now be selected individually using the direct selection tool.

After the grouped object is ungrouped twice ....

Select the objects to edit and style them using Adobe Illustrator tools!

At the end ... now ready to be customized

Geographic Imager: Create shaded relief from a DEM

With Geographic Imager 3.x, you can import DEM files to Adobe Photoshop and can create shaded relief images.

step 12: Shaded relief image completed

There are two methods to achieve this:

Method 1: Run the pre-made JavaScript and apply it to all images

After opening your DEM image, choose File > Scripts > Browse… and select Shaded Relief.jsx from the SampleScripts folder inside the Geographic Imager Tutorial folder. It will generate the shaded relief image for the opened DEM image based on the settings in the JavaScript file.


Method 2: Create shaded relief images manually

We’ll use the DEM file Rocky Mountains.dem available in the Geographic Imager Tutorial folder for this demonstration.

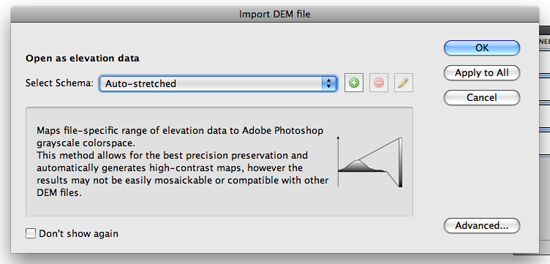
1) Open the Rocky Mountains.dem image from the Geographic Imager tutorial folder. Geographic Imager automatically detects it as a DEM file and provides the option to select the DEM image import method. For this demonstration, choose Auto-Stretched from the Select Schema drop-down list.

Step 1: Import DEM file option

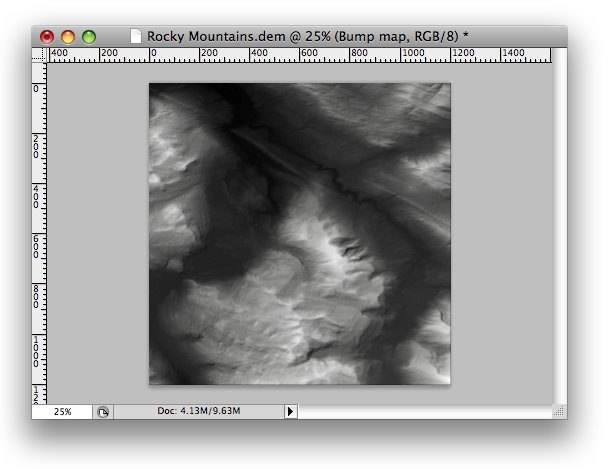
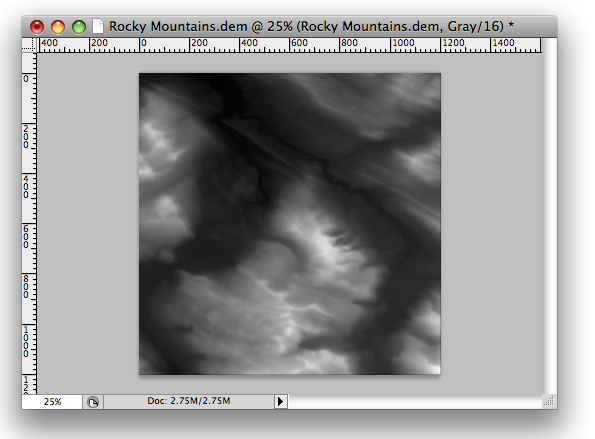
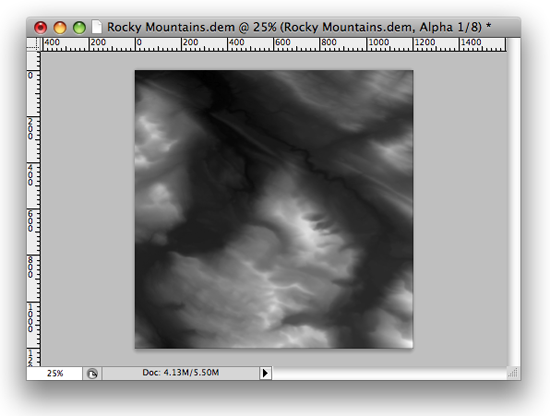
The imported DEM is opened in black and white. Take a look at the header of the image (or tab of the image file). Notice that it displays “Gray/16”. This indicates that the image is in the 16 Bits/Channel Grayscale mode.

step 1: Imported DEM image

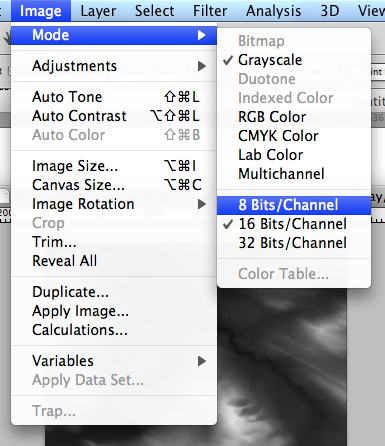
2) Now, change the image mode from 16 Bits/Channel Grayscale to 8 Bits/Channel RGB. From the top menu bar, choose Image > Mode and then 8 Bits/Channel. Once again, go to Image > Mode, this time choose RGB Color.

step 2: Changing the color mode

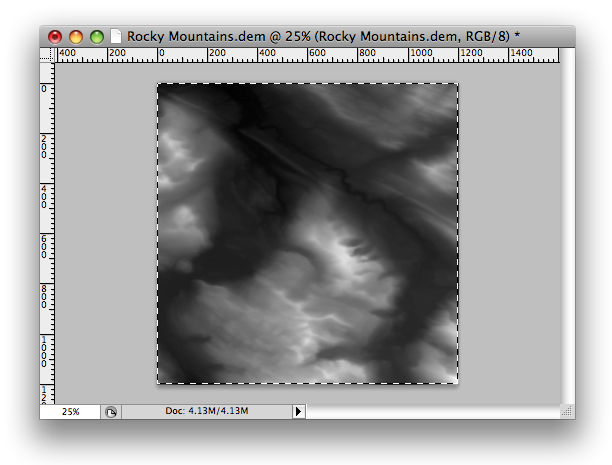
Once completed, take a look at the image header again (or file tab). Now “RGB/8” is indicated in the header, meaning that the image is now in the 8 Bits/Channel RGB color mode.

step 2: Color mode changed

3) Select the entire canvas (use the Rectangular Marquee Tool) and copy the selected area to the clipboard (Edit > Copy).

step 3: Select the entire canvas

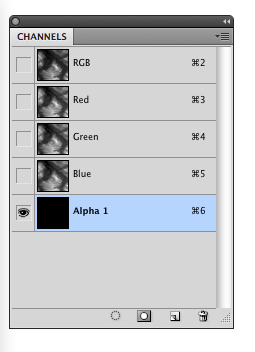
4) Open the Channels panel (Window > Channels) and add one Alpha channel by clicking the Create new channel button at the bottom of the panel or go to the panel option menu and choose New Channel. Leave the channel name as “Alpha 1”.

step 4: create a new channel

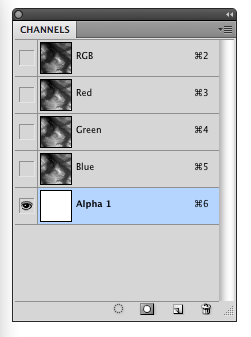
5) Select the “Alpha 1” in the Channels panel and fill it in white using the Paint Bucket Tool.

step 5: Filling Alpha channel

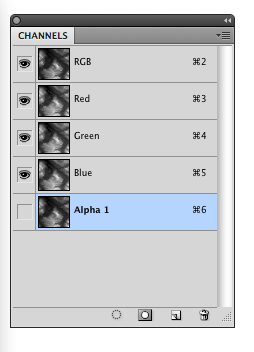
6) In step 3 we copied the selected area (the entire canvas) to the clipboard, now we’re going to paste it to the new channel. Select “Alpha 1” in the Channels panel, and paste it (Edit > Paste). You can see that the same image is displayed for all the channels when the copied area is successfully pasted. Make the Alpha 1 channel invisible and make sure the RGB channels are visible.

step 6: pasted canvas

7) Deselect the area (Select > Deselect from the top menu bar).

step 7: deselected area

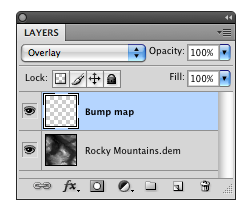
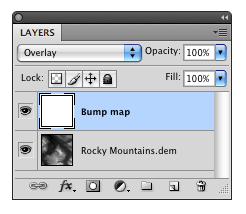
8) In the Layers panel (Window > Layers), create a new layer named Bump map. Change the Blending mode to Overlay. step 8: New Layer "Bump map"

9) Using the Paint Bucket Tool again, fill the new “Bump map” layer with white.

step 9: fill white

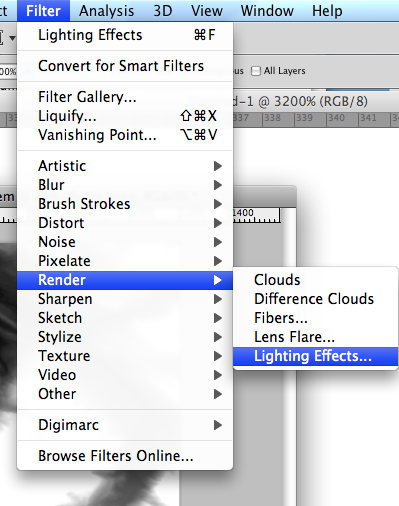
10) From the menu bar, choose Filter > Render > Lighting Effects…

step 10: Menu Filter > REnder > Lighting Effects ...

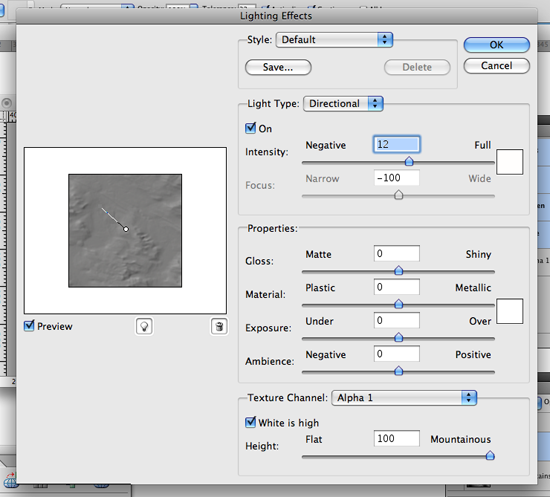
11) Adjust the settings in the Lighting Effects dialog window.

step 11: adjusting the light effect

12) The shaded relief image is completed! You can use this image to overlay with other georeferenced images with Geographic Imager or with vector datasets with MAPublisher.

step 12: Shaded relief image completed

News Archive