My Account     Contact Us     Cart

Avenza Releases Geographic Imager 3.1 for Adobe Photoshop

– Powerful geospatial plug-in suite now supports Adobe Photoshop CS5 for Windows –

Toronto, ON, May 19, 2010 — Avenza Systems Inc., producers of MAPublisher® and MAPublisher LabelPro® cartographic software for Adobe Illustrator as well as MAPdataUSA, MAPdataCanada and MAPdataWorld royalty-free GIS data sets, announces the release of Geographic Imager® 3.1 for Windows, the latest in powerful software that adds geospatial functionality to Adobe Photoshop. The Mac OS version of Geographic Imager offering Adobe Photoshop CS5 support will follow shortly.

“This release of Geographic Imager takes spatial imaging to a new level with the added support for the new Adobe Photoshop CS5,” said Doug Smith, Avenza’s Director of Sales. “Our rapid response to Adobe’s newest release is a testament to our commitment to consumer needs and demands and ensures a seamless upgrade transition for Photoshop users,” he added.

Geographic Imager 3.1 for Windows also includes new functionality for creating MAPublisher MAP Views from Adobe Photoshop paths. A MAPublisher 8.3 license is required for this functionality.

Geographic Imager enhances the already commanding Adobe Photoshop imaging environment by adding all the tools and technology necessary to support geospatial images such as aerial and satellite imagery. In addition to allowing the use of Adobe Photoshop and its powerful native imaging functions such as cropping, transparencies and layer adjustments, Geographic Imager adds the ability to import and recognize common industry raster image formats, automatically mosaic and tile images, reproject and transform images, georeference images based on ground control points and export images with all spatial information intact.

New Features in Geographic Imager version 3.1 for Windows

  • Added support for Adobe Photoshop CS5 (both 32 and 64 bit) (Windows only).
  • Added support for transferring Adobe Photoshop paths to MAPublisher for Adobe Illustrator (MAPublisher 8.3 required)

General Features and Benefits of Geographic Imager

  • Allows the use of Adobe Photoshop native functionality without destroying the spatial properties of the image
  • Import and export a variety of commonly used spatial raster data formats along with all georeferencing
  • Georeference non-referenced imagery
  • Reproject spatial imagery
  • Automatic mosaicking and tiling of spatial imagery
  • Crop spatial imagery based on geographic coordinates
  • Automated scripting for using of Geographic Imager in conjunction with Adobe Photoshop automation tools

More about Geographic Imager

Geographic Imager is powerful software for working with spatial imagery in Adobe Photoshop that leverages the superior image editing capabilities of this raster-based image-editing software.

Geographic Imager 3.1 for Adobe Photoshop on Windows is available now as a free upgrade for all Geographic Imager customers using Microsoft Windows with a valid maintenance subscription and as an upgrade for non-maintenance members at US$319. New licenses are US$699 for a single-user fixed commercial license. Prices include 1 year of maintenance. Educational and floating licenses as well as discounted MAPublisher/Geographic Imager bundles are also available. Full details are available at www.avenza.com/geographic-imager.

More about Avenza Systems Inc.

Avenza Systems Inc. is an award-winning, privately held corporation that provides cartographers and GIS professionals with powerful software tools for making better maps. In addition to software offerings for Mac and Windows users, Avenza offers value-added data sets, product training and consulting services. Visit www.avenza.com for more details.

For further information:
Avenza Systems ● 416-487-5116 ● info@avenza.com ● www.avenza.com

Avenza Releases MAPublisher 8.3 for Adobe Illustrator

– Powerful cartographic suite now supports the new Adobe Illustrator CS5 –

Toronto, ON, May 18, 2010 – Avenza Systems Inc., producers of MAPublisher cartographic software for Adobe Illustrator and Geographic Imager spatial tools for Adobe Photoshop, is pleased to announce the release of MAPublisher 8.3 for Adobe Illustrator. MAPublisher 8.3 is the latest version of this powerful mapmaking software used to produce high quality maps from GIS data for both print and electronic distribution which now offers support for the new version of Adobe Illustrator, CS5.

MAPublisher 8.3 for Adobe Illustrator is a full product upgrade that is free of charge to all current MAPublisher Maintenance Program subscribers and replaces the current shipping version of MAPublisher, version 8.2, for all new customers using Adobe Illustrator CS3, CS4 and CS5.

“We have once again listened to the requests of our users and implemented a host of new features with MAPublisher 8.3,” said Ted Florence, President of Avenza, “In addition to support for Illustrator CS5, this new and exciting MAPublisher version now offers the ability to transfer map objects between documents, automatically create knockouts for text objects, and contains an enhanced MAP Web Author JavaScript API and dozens of other features which together significantly advance this powerful and widely used cartographic and map-design platform.” he added.

MAPublisher 8.3 includes all the significant functionality introduced in earlier releases of MAPublisher as well as the following new features and enhancements.

New Features of MAPublisher 8.3 for Adobe Illustrator

  • Compatibility with Adobe Illustrator CS5 for both Mac and Windows
  • New Line Plotter function to create polylines by entering coordinates or the distance and bearing values between points
  • Import MAP Objects to copy MAP objects between documents, including Stylesheets and MAP Selections
  • Enhanced MAP Selection functionality offering additional selection options including spatial, art and attribute
  • New knockout function for easily creating knockouts for text objects
  • Buffer Art function to create area objects around points and lines
  • MAP Attribute Panel enhancements and optimizations
  • New Layer Notes functionality to record information including original dataset path, format, co-ordinate system, object count and date
  • Enhanced export to Geospatial PDF functionality now offers control over exported layers with attributes, ability to easily assign attribute values to be used as object names, item sort order and round-trip data control
  • MAPublisher Spatial Database import system for ESRI geodatabases now included (Windows only)
  • New MAPublisher Web Author JavaScript API functionality including various runtime operations
  • New functionality to create MAP Views from Adobe Photoshop paths (Geographic Imager license required)
  • Various other user interface improvements and performance enhancements to improve usability

More about MAPublisher for Illustrator

MAPublisher for Illustrator is powerful map production software for creating cartographic-quality maps from GIS data. Developed as a suite of plug-ins for Adobe Illustrator, MAPublisher leverages the superior graphics capabilities of this graphics design software for working with GIS data and producing high-quality maps with efficiency.

MAPublisher 8.3 for Illustrator is available free of charge to all MAPublisher for Illustrator customers with a valid maintenance subscription and as an upgrade for non-maintenance members at US$599. New licenses are US$1399. Academic, floating and volume pricing is available. Prices include 1 year of maintenance. Full details are available at www.avenza.com.

More about Avenza Systems Inc. Avenza Systems Inc. is an award-winning, privately held corporation that provides cartographers and GIS professionals with powerful software tools for making better maps. In addition to software offerings for Mac and Windows users, Avenza offers value-added data sets, product training and consulting services.  Visit www.avenza.com for more details.

For further information:
Avenza Systems ● 416-487-5116 ● info@avenza.com ● www.avenza.com

Using MAPublisher and Illustrator tools to create great looking road layers

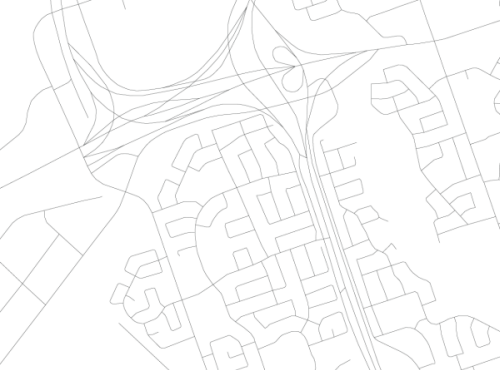
Here’s a question we receive at Avenza support quite often: I’ve located and imported a GIS layer of road lines with attributes for the city I’m mapping. How can I turn this:

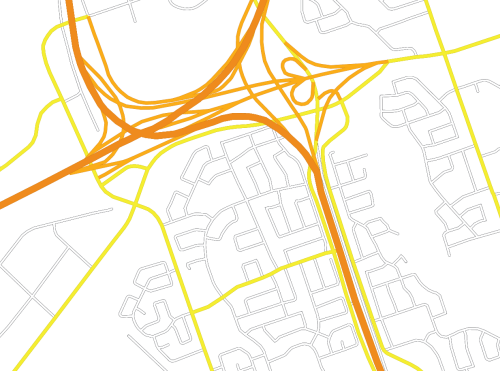
into this:

Getting Started

The workflow for this process involves the use of both MAPublisher and Adobe tools, specifically MAP Stylesheets and MAP Selections along with Illustrator’s Graphic Styles and the Appearance Panel.

This process works on roads that have an attribute on which you can base classification rules. My road data has a column named “CLASS” with four categories: Controlled, Controlled-Ramp, Highway, and Street. I’ve created a graphic style for each and loaded them using “Open Graphic Style Library”. I keep the road styles I have created in a template document titled RoadStyles.ai so that I can import the graphic styles I need into whatever map I’m making from my template (see Adobe Graphic Styles Help).

Controlled Access Highway: Controlled Access Highway
Controlled Access Ramp: Controlled Access Ramp
Major Road: Major Road
Minor Road: Minor Road

These styles all have been created using the Illustrator Apprearance panel to overlay two strokes, the top stroke with a smaller weight and different colour than the bottom stroke (see Adobe Appearance Panel Help).

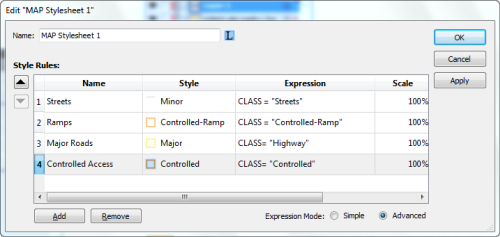
With our graphic styles set I can now apply the MAP Stylesheet I built using the following expressions:

Cleaning up with groups

Once we apply these styles using MAPublisher Stylesheets, we will see what steps we muys take to get the appearance we want. Our roads look like this:

but we want them to look like this:

Why does this happen?

This occurs because MAP Stylesheets applies graphic styles at the path level. To look like intersections, each road classification must become one object, whether by being grouped or by turning the various paths into a compound path. Grouping is the preferred method for managing these objects since a compund path will delete the attributes of all paths that are being compounded. In this case, the street names field would be blank for our compound path object as dozens of streets are turned into one compund path. The consequence of this would be to make automatic labelling with MAPublisher Label Pro impossible. A set of paths turned into a group will not have their attributes available to MAPublisher while in a group, however these objects can always be ungrouped making individual paths and their original attributes available again.

Grouping Objects

In order to group our road classes we will have to select the road paths belonging to each class. The expressions we created when defining our MAP Stylesheet rules are available to us to use again through the Expression Library (new in MAPublisher 8.3). We can use MAP Selections to individually select each of our road classes. Once selected the street classes can be grouped using CTRL+G on your keyboard or Object > Group from the menu (See Adobe Group Help). The final step is to re-apply the graphic style appropriate to each group using the Adobe Graphic Style panel.

If we want to get technical here in considering what has happend to our artwork, using the Appearance panel we can see that each of the paths we initially imported now has a graphic style applied to it on two levels: at the path level (done through MAP Stylesheets) and at the group level (done by grouping and applying a graphic style to the group). It is possible to symbolize our artwork even further, at the layer level, by slecting the target symbol for our roads layer (See Adobe Layers Help). If desired we could apply a transparency at the layer level that would supersede all graphic styles used on objects in the layer. Our artwork will now have symbolization that suggests intersections, giving our road map a much neater appearance.

Tweaking

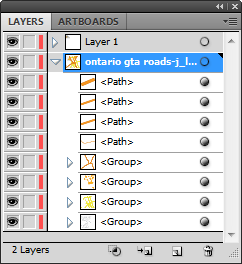
Now that our roads are grouped together, they are much easier to manage in the Illustrator Layers panel.

Groups can be stacked easily. My preference is to arrange with minor roads at the bottom, increasing to multi-laned divided highways at the top of the hierarchy. With our objects grouped it is easy to move objects between groups. Any path can be selected using the Direct Selection Tool and dragged in the Layers panel between groups. This is much simplier than having to use the Appearance panel to strip the path of both graphic styles and apply the desired style. There will be some situations where we will need to override the intersection appearances that result from grouping. In this image we have onramps that definitely do not interesect as this line work suggests!

To do this we must select the road lines that will be on top of the intersection, and using the Illustrator Layers panel, drag them from their group (it does not matter where in the layer hierarchy the are placed).

Our ungrouped ramps can now be sent backwards and forwards relative to other paths, giving a truer representation of the road network:

Using MAP Stylesheets to create a Legend

So why use stylesheets if we must manually group the objects after use? For a few reasons: it keeps us organized, it adds the expressions to the expression library, and most importantly MAP Stylesheets can automatically generate a Legend for us that reflects our Stylesheet rule names:

Good luck creating customized road styles! A deeper understanding of the Illustrator object styling hierarchy can go a long way in helping you use MAPublisher to leverage your GIS datasets!

Create Knockouts with MAPublisher 8.3

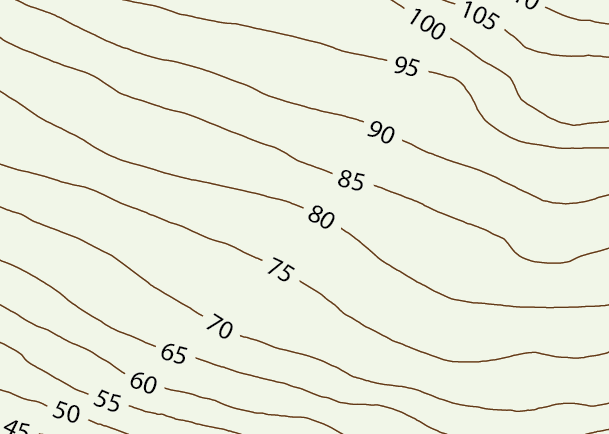
We receive many questions about cartographic techniques. A very popular question from MAPublisher users is “How do I mask lines behind contour labels?”

Adobe Illustrator provided some tools to achieve that through a pretty complicated workflow, so we decided to create our own tool! The upcoming release of MAPublisher 8.3 has a very handy new feature called Create Knockouts, here is how it works.

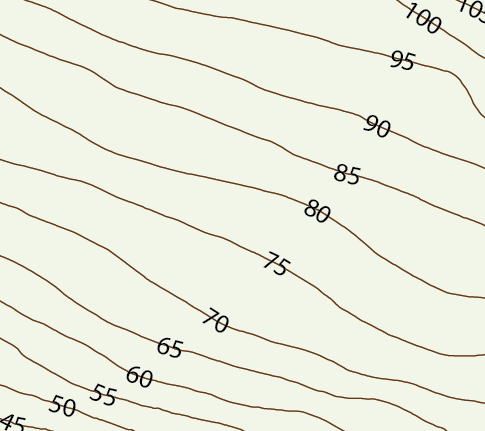
First, you need a labelled map – for example contours and labels.

No knockouts

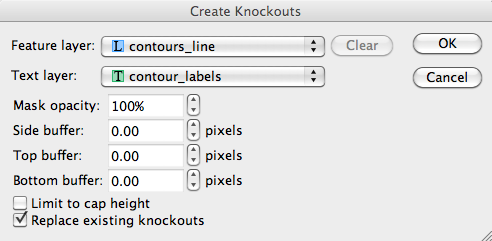
Start the Create Knockouts tool. All you need to do is choose the layer that contains the lines to be masked and the text layer with the labels.

Create Knockouts button

There are many options available, but let’s keep the default (100% opacity, no buffer around the text, use the default text bounding box from Adobe).

Create Knockouts dialog box

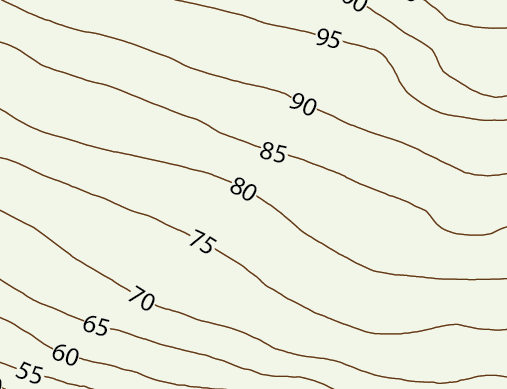
The result:

Tight fit around label

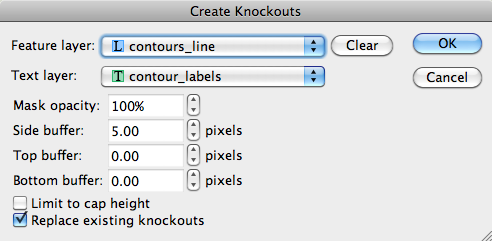
These knockouts are little bit tight after all, maybe we should add some buffer distance on the side. Start Create Knockouts again (no undo required!). Choose a side buffer of 5 pixels, and make sure to check “Replace existing knockouts”.

Create Knockouts dialog box

Et voilà!

Perfect!

MAPublisher 8.3 is releasing very soon. Watch our Twitter and News page for announcements.

News Archive